Semana 1
Xcode
Xcode no es solo un IDE más, es una herramienta compleja.
Para ilustrar el repaso por los conceptos más básicos de Xcode, hacemos un Hello World en el que simplemente imprimimos Hello World en la consola. Para no convertir este artículo en un tutorial de Xcode 5, pongo un enlace hacia un Tutorial de Xcode, un tutorial de Cómo crear el primer proyecto en Xcode y listo algunas anotaciones que me parecen interensantes:
- Cuando se crea un proyecto en Xcode, te da la posibilidad de especificar un
Class Prefix. Digamos que esto sustituye el sistema de paquetes de otros lenguajes y entornos, y sirve para evitar que existan clases con el mismo nombre. Algunos ejemplos de prefijos de clase archiconocidos pueden ser NS, UI y CF. - Un proyecto Xcode escrito en Objective-c no deja de ser un programa en C supervitaminado. Por tanto el punto de entrada es la función
main, que Xcode coloca MyProject >> Supporting FIles >> main.m. El contenido por defecto de esta función en este tipo de proyectos es la llamada a UIApplicationMain (para iniciar el ciclo de eventos de la aplicación). Lo encapsula en un bloque@autoreleasepoolque básicamente sirve para liberar la memoria tras la ejecución. - El delegado de la aplicación es una clase que podemos considerar como la puerta para que la aplicación se comunique con el dispositivo. Entre sus métodos, el más importante es
didFinishLaunchingWithOptionsque avisa cuando la aplicación se abre. - En Xcode el uso de los Targets es un sistema para organizar el proceso de compilación del proyecto. Se pueden añadir pasos a los que por defecto se llevan a cabo cuando se construye la app, que se precompila -> compila -> enlaza -> empaqueta.
- El uso de esquemas, también es útil para manipular la ejecución. Por ejemplo es donde habría que definir los argumentos de entrada.
Un vistazo rápido a C
Es importante recordar algunos conceptos del "abuelo" C, para ello os recomiendo echar vistazo a algún tutorial, por ejemplo este. Nosotros creamos un proyecto de C en Xcode y jugamos un poco con los tipos de variables, la declaración y definición de funciones, con los argumentos de entrada, etc. Algunas anotaciones que merece la pena recordar:
- Podemos definir nuestros propios tipos de variables con typedef, ejemplo:
typedef unsigned int NSUinteger; - Con
sizeofpodemos saber el tamaño que ocupa un tipo en memoria. - Los archivos .h no se meten en el target porque no se compilan.
- Es importante recordar la visibilidad de las funciones. Si declaras una función en el .h, se podrán invocar dichas funciones importando la cabecera, sin embargo, si se declara y define una función en el .c se considera una función privada, útil en el ámbito del módulo.
- Es posible declarar una variable en el ambito del módulo pero solo visible en la función donde se define. En el siguiente ejemplo
sequencese incrementará en cada llamada,next_in_sequence()puede ser una función publica pero quien la llame no pude modificar el valor desequence:
NSUinteger next_in_sequence(){
    static NSUinteger sequence = 0;
    sequence ++;
    return sequence;
}
Primera toma de contacto con Objective-c
Para ir metiéndonos en "manteca", creamos un nuevo proyecto llamado Beers y que nos servirá durante toda la semana como proyecto de pruebas.
Creamos una clase llamada Beer que nos servirá de ejemplo para ilustrar como se definen las variables de la clase, de la instancia, los método privados, públicos, etc.
En Beer.h (interfaz de la clase) vemos que es una clase que extiende a NSObject @interface Beer : NSObject, y por tanto hereda ciertos métodos propios de cualquier objeto. Vamos a declarar varias variables de instancia, por tanto en la interfaz:
@private
    NSString *name;
    NSString *color;
    NSUInteger grade;
}
Una variable name de tipo NSString que representará el nombre de la cerveza, una variable color de tipo NSString que representará el color de la cerveza y una variable grade del tipo NSUInteger que representará la graduación de alcohol. Los asteriscos de name y color denotan que realmente dichas variables son punteros, que guardarán la dirección de memoria (heap) donde se almacenará el contenido del objeto NSString. Sin embargo grade, al ser un NSUInteger o sea un entero sin signo no es más que un tipo primario que puede ser guardado localmente (stack).
Setter & Getter
Es poco recomendable leer y escribir las variables de instancias accediendo directamente con el operador -> de esta forma cerveza->name = @"Mahou";. Es más común implementar los métodos que leerán y escribirán estas variables, los getter y los setters. De esta manera tendremos varias vantajas como mayor control en la inicialización poniendo condiciones por ejemplo, no se reserva memoria hasta que se llame al método, omitir el setter impidiendo que sea escrita desde fuera, etc.
Por convenio el getter se nombran igual que la variable que devuelve y los setters se nombran igual que la variable pero con el prefijo set.
- (NSString *) name;
- (void) setName: (NSString * )newName;

- (NSString *) color;
- (void) setColor: (NSString * )newColor;

- (NSUInteger) grade;
- (void) setGrade: (NSUInteger)newGrade;
En Beer.m la implemetación de estos métodos sería algo así:
- (NSString *) name{
    return self->name;
}

- (void) setName: (NSString * )newName{
    self->name = newName;
}
Existe una notación que nos permite invocar a los métodos usando el punto
[mahou setName:@"Mahou"]; es exactamente igual que mahou.name = @"Mahou";, esta notación punto solo es válida si cumples la convención de nombrar el getter con el nombre de la variable y el setter como setNombre de la variable de instancia.
La variable self es un puntero al propio objeto, pero hay convenio para nombrar las variables privadas de instancias, con el prefijo _ para evitar confusión:
- (void) setCountry: (NSString * )newCountry{
    _country = newCountry;
}
Con @property definimos una variable de instancia y el compilador le añade setter y getter:
@property (nonatomic, strong) NSString *country;
Debes especificar con @synthesize country = _country; si quieres programar tu propio setter y getter. Cuando se establece una propiedad booleana como @property (nonatomic) BOOL married; podemos renombrar el nombre del getter @property (nonatomic, getter = isMarried) BOOL married;.
Métodos inicializadores
Para ilustrar la inicialización de los objetos vamos a crear una nueva clase llamada Person.
En la intefaz creamos por ejemplo estas propiedades:
@property (nonatomic, strong) NSString *name;
@property (nonatomic) NSUInteger age;
@property (nonatomic, strong) NSString *address;
@property (nonatomic, getter = isMarried) BOOL married;
Podemos declarar tantos métodos inicializadores que queramos pero todos deben empezar por init. Normalmente se suelen anidar de manera que un método inicializador puede llamar a otro más descriptivo pasándole valores por defecto. Aquel que recibe más parámetros y por tanto describe mejor al objeto que iniciliza se denomina designated initializer. Un ejemplo:
- (id) init;
- (id) initWithName: (NSString *)name;
- (id) initWithName: (NSString *)name andAddress: (NSString *)address;
- (id) initWithName: (NSString *)name andAddress: (NSString *)address age: (NSUInteger) age;
La implementación de estos inicializadores podría ser así:
- (id) initWithName: (NSString *)name andAddress: (NSString *)address age: (NSUInteger) age{
    self = [super init];
    if(self){
        _name = name;
        _address = address;
        _age = age;
    }
    return self;
}
| Nota |
|---|
| En los métodos inicializadores no se usan las propiedades, son los único métodos que deben usar las variables de instancia |
Los siguientes métodos podrían implementarse así:
- (id) initWithName: (NSString *)name andAddress: (NSString *)address{
    self = [self initWithName:name andAddress:address age:99];
    return self;
}

- (id) initWithName: (NSString *)name{
    self = [self initWithName:name andAddress:@"Sin definir"];
    return self;
}

- (id) init{
    self = [self initWithName:@"Anonimo"];
    return self;
}
Métodos de clase
A veces es interesante crear un método que solo sirva para inicializar un objeto con los parámetros ya predefinidos. Para eso se usan los métodos de clase, que se caracterizan porque sirven para inizializar objetos, no pueden acceder a las variables de instancia y en la interfaz/implementacións viene precedidos por un signo más. Ésta podría ser un método de clase de Person:
+ (id) personWithName: (NSString *)name{
    return [[Person alloc] initWithName:name];
}
Y así se podría crear una persona Person *homer = [Person personWithName:@"Homer Simpson"];
Primeros test de unidad
En los proyectos de Xcode, por defecto se crea un directorio donde crear la clases de testeo. Por lo general son clases que extienden a XCTestCase, y en la implementación estarán los métodos que prueban el comportamiento de las clases. Éste sería un ejemplo de test:
#define TEST_ERROR_MSG @"OMG! 💀"
...
- (void)testCanCreateABeerList {
    BeerList *allBeers = [[BeerList alloc] init];
    XCTAssertNotNil(allBeers, TEST_ERROR_MSG);
    XCTAssertEqual(0, [allBeers count], @"Expected %d but found %lu!", 0, [allBeers count]);
}
Nota
Desarrollo guiado por pruebas TDD es una técnica de programación que consiste en implementar primero los test unitarios e ir añadiendo el código necesario mínimo hasta pasar la prueba con éxito.
Nota
Así se puede iterar un array usando bloques:
[[allBeers allBeers] enumerateObjectsUsingBlock:^(id obj, NSUInteger idx, BOOL *stop) {
    Beer *beerToTest = (Beer *)obj;
    NSLog(@"%lu",(unsigned long)idx);
}];
KVC: Key Value Coding
KVC es un mecanismo que nos da la posibilidad de obtener y definir propiedades de una clase especificando identificadores (key) que representan los nombres de los atributos a los que queremos acceder.
[allBeers valueForKey:@"count"] es igual que allBeers.count
Leer archivo plist
Despues de crear y rellenar un archivo plis con esta estructura:
Desde la lista de cevezas podemos leerlo, y añadirlo como cerveza:
NSString *fileNameAndPath = [[NSBundle mainBundle]pathForResource:fileName ofType:@"plist"];
NSArray *array = [NSArray arrayWithContentsOfFile:fileNameAndPath];

for (NSDictionary *dict in array) {
   Beer *beer = [[Beer alloc] init];
   beer.name = [dict objectForKey:@"name"];
   beer.grade = [[dict objectForKey:@"grade"] integerValue];
   beer.color = [dict objectForKey:@"color"];
   beer.country = [dict objectForKey:@"country"];

   []self addBeer:beer];
}
MRC (Manual Reference Counting) y ARC (Automatic Reference Counting)
Hasta el iOS 5, el desarrollador tenía que mantener manualmente el seguimiento de la cantidad de referencias correspondientes a cada uno de los objetos creado (MRC), liberándolo correctamente después de que el objeto ya no fuese necesario para nadie más. De modo que, por ejemplo, antes de iOS 5, era preciso escribir algo como esto:
NSArray *anArray = [[NSArray alloc] initWithObjects:@"one", @"two", nil];
self.myArrayProperty = anArray;
[anArray release];
A partir de iOS 5, el compilador añade automáticamente el código necesario para gestionar la memoria. Pero es preciso conocer el mecanismo por si nos tenemos que enfrentar con código pre-iOS 5.
¿Cuándo tengo que liberar memoria? Cuando añado un alloc, new o copy hay liberar con release.
¿Cuándo tengo que hacer -retainCount? Aquí la respuesta.
Nota rápida: Solo se debe usar weak en los delegados y outlet.
Ejercicio final de semana:
Para acabar la semana, afianzamos los conceptos con un ejercicio: Enunciado.
Está resuelto en este repositorio: Resolución
Algunas anotaciones extras
Alcatraz The package manager for Xcode:
Synx A command-line tool that reorganizes your Xcode project folder to match your Xcode groups
SimPholders A small utility for fast access to your iPhone Simulator apps.
POP Prototyping on Paper | iPhone App Prototyping Made Easy.
CocoaPods The Dependency Manager for Objective C.
- Editas Podfile con las dependencias
- pod install instala las dependencias
- Y desde ese momento, se debe abrir el workspace y no el xcodeproject.
Categorias:
- Se crea una categoria sobre "algo".
- Si escribes un método que ya existe, la sobreescribe.
- Lo importamos en el pch de sipporting files para tenerlo en todos.
- Las categorias en principio no soportaban propiedades, es mas facil definir una variable de instancia.
Semana 2
Empezamos planificando la semana y presentándonos a un nuevo profesor: Fran Sevillano.
MVC
El patrón Model-View-Controller consiste en dividir el código en 3 capas diferenciadas, donde los modelos representan los datos que se van a manejar, las vistas representan los elementos que conforman la interfaz de usuario y los controladores, que responden a los eventos para interactuar con las vistas y con los modelos. Las vistas en Objective-c no tiene acceso a los modelos directamente sino que se comunica con los controladores que les proveerá de la información necesaria. Esta cominicación "fluye" por varias vías.

Target-Action
Esta técnica consiste en enviar un mensaje cuando un evento ocurre. El objeto target recibirá un mensaje, action cuando ocurra el evento controlEvents
(void)addTarget:(id)target action:(SEL)action forControlEvents:(UIControlEvents)controlEvents
Hay muchos objetos en el SDK al los que se les puede enviar mensajes en respuesta a un evento. Como por ejemplo: UIButton, UILabel, UISwitch, UISlider, UISegmentedControl, UIPageControl, UIStepper, etc.
Así podemos añadir un botón a la vista, y asignarle un título.
UIButton *button = [UIButton buttonWithType:UIButtonTypeSystem];
button.frame = CGRectMake(10, 10, 100, 50);
[self.view addSubview:button];
[button setTitle:@"Normal" forState:UIControlStateNormal];
[button setTitle:@"Resaltado" forState:UIControlStateHighlighted];
Si queremos mandarle un mensaje cuando sea pulsado, y desencadene la ejecución del método buttonPressed:
[button addTarget:self action:@selector(buttonPressed) forControlEvents:UIControlEventTouchDown];
El manejo de los labels es similar. Así añadimos un label, con el texto Hola, con la tipogradía Georgia de tamaño 20 puntos en color verde:
UILabel *label = [[UILabel alloc] initWithFrame:CGRectMake(300, 10, 300, 50)];
[self.view addSubview:label];
[label setText:@"Hola"];
[label setFont:[UIFont fontWithName:@"Georgia" size:20]];
[label setTextColor:[UIColor greenColor]];
Un ejercicio sencillo, dadas las propiedades UILabel * mylabel y UISwitch * myswitch ¿Cómo cambiar la manera en la que el sistema truca el texto del label, dependiendo de si un switch está activado o desactivado?
@property (nonatomic, strong) UILabel * mylabel;
@property (nonatomic, strong) UISwitch * myswitch;

...

- (void)exercise
{

    self.myswitch = [[UISwitch alloc] initWithFrame:CGRectMake(10, 140, 300, 50)];
    [self.view addSubview:self.myswitch];
    [self.myswitch addTarget:self action:@selector(setLineBreakMode) forControlEvents:UIControlEventValueChanged];

    self.mylabel = [[UILabel alloc] initWithFrame:CGRectMake(10, 190, 120, 50)];
    [self.view addSubview:self.mylabel];
    [self.mylabel setText:@"Lorem ipsum dolor sit amet"];
    [self.mylabel setBackgroundColor:[UIColor greenColor]];

}

- (void)setLineBreakMode
{
    if ([self.myswitch isOn]) {
        [self.mylabel setLineBreakMode:NSLineBreakByTruncatingHead];
    }else{
        [self.mylabel setLineBreakMode:NSLineBreakByTruncatingTail];
    }

}
Y un sencillo ejemplo de cómo crear un UISegmentedControl, con las opciones Hola y Adiós y que mande el mensaje setLineBreakMode cuando cambie su valor:
UISegmentedControl * mysegmented = [[UISegmentedControl alloc] initWithItems:@[@"Hola",@"Adios"]];
[mysegmented setFrame:CGRectMake(10, 390, 200, 50)];
[self.view addSubview:mysegmented];
[mysegmented addTarget:self action:@selector(setLineBreakMode) forControlEvents:UIControlEventValueChanged];
Delegation
Consiste en delegar parte de la funcionalidad de un objeto a otro, habilitando por ejemplo la posibilidad de personalizar multiples vistas desde un solo controlador.
Para establecer la relación de delegación se debe llevar a cabo los siguientes pasos:
- La clase delegada debe definir un protocolo (con el mismo nombre del controlador y el sufijo Delegate), que consiste en declarar una serie de métodos.
@protocol MyViewControllerDelegate <NSObject>
- (void) oneMethod;
@end
- La clase delegada debe tener una propiedad (weak) llamada
delegate, del tipo genéricoidcon la restricción de que extienda el protocolo:
@property (nonatomic, weak) id<MyViewControllerDelegate> delegate;
- Que el método delegador extienda el protocolo:
@interface OtherViewController ()<MyViewControllerDelegate>
- Que el método delegador implemente los métodos del protocolo:
- (void) oneMethod{
    NSLog(@"Pollito");
}
- Para establecer que un objeto de
OtherViewControllersea el delegador de un objetoMyViewController, sería algo así (si se hace desdeOtherViewController):
self.anyViewController = [[MyViewController alloc] init];
self.anyViewController.delegate = self;
- Ahora desde
MyViewControllerpodemos delegar algunas funcionalidades sobreOtherViewController, en este caso delegar el métodooneMethod:
[self.delegate oneMethod];
Normalmente se usa la técnica delegate para definir la funcionalidad de un conjunto de controles como: UITextField y su protocolo UITextFieldDelegate con el que podemos personalizar su comportamiento, UITextView y UITextViewDelegate, UIAlertView, UIActionSheet, etc.
Notificaciones
Las notificaciones se usan para comunicar los modelos con los controladores. Consiste en enviar un mensaje de difusión, con cierta información, que es escuchada por aquellos objetos que se subscriban. Es la clase NSNotificationCenter la encargada de este flujo.
El envío y lectura de notificaciones se entiende mucho mejor con un ejemplo. Imaginemos dos vistas diferentes independeientes, gestionadas mediante dos ViewControllers. En la primera de las vistas tenemos un UITextField y la segunda un UILabel. El propósito es que cuando se cambie campo de texto de la primera vista, se escriba en el label de la segunda vista exactamente el mismo texto:
@property (nonatomic, strong) UITextField *textField;

...

- (void)exercise
{
    self.textField = [[UITextField alloc] initWithFrame:CGRectMake(10, 40, 300, 40)];
    [self.view addSubview:self.textField];
    [self.textField addTarget:self action:@selector(changedField) forControlEvents:UIControlEventEditingChanged];


}

- (void)changedField{
    [[NSNotificationCenter defaultCenter] postNotificationName:@"myTextNotification" object:self userInfo:@{@"mytexto" : self.textField.text}];
}
Así estaríamos enviando una notificación llamada myTextNotification con los datos serializados en un diccionario llamado userInfo, en este caso el nuevo texto como valor cuya clave es @"mytexto". Los recibiría todo aquel que se suscriba a dicha notificación. En este caso desde la segunda vista:
@property (nonatomic, strong) UILabel * mylabel;

...

- (void)exercise
{
    self.mylabel = [[UILabel alloc] initWithFrame:CGRectMake(10, 90, 300, 40)];
    [self.view addSubview:self.mylabel];

    [[NSNotificationCenter defaultCenter] addObserver:self selector:@selector(receiveNotification:) name:@"myTextNotification" object:nil];

}

- (void)receiveNotification:(NSNotification *)notification
{
    NSDictionary *userInfo = notification.userInfo;
    self.mylabel.text = [userInfo objectForKey:@"texto"];
}
De esta manera recibiría la notificación myTextNotification y se la enviaría al método receivenotification que actualiza el texto del label.
Martes 10
View Controllers
Los controladores de las vistas son el nexo entre los datos y lo que se presenta al usuario. Aunque la SDK provee de una serie de controladores de vistas por defecto con una serie de comportamientos establecidos, nosotros podemos crearnos las nuestras propias.
Las vistas representan un area que muestra un contenido y recibe los eventos táctiles. Pueden estar anidadas y animadas y desconocen qué hay en su entorno. Cada vista solo puede ser gestionada por un solo controlador.
Controladores de contenido
Presentan contenido a través de una vista o una jerarquía de las mismas. Estos controladores normalmente conocen el subconjunto de datos de la aplicación relevantes a su papel en la aplicación. Si tenemos un controlador de la vista para mostrar el perfil de un usuario, el controlador de la vista conocerá cuáles son los datos del usuario como su foto, nombre, etc.
Cada controlador de la vista es responsable de gestionar todas las vistas en la jerarquía de una sola vista. Esto es que hay una correspondencia 1–1 entre el controlador y la vista. No se deberían utilizar múltiples controladores para gestionar una sola vista ni un solo controlador para gestionar varias jerarquías de vistas. De nuevo, la regla (en general) es utilizar un controlador por cada pantalla de la aplicación.
Controladores Contenedores
Tienen contenido que pertenece a otros controladores de vista. Éstos otros controladores de vista han sido explícitamente asignados como hijos de este controlador de vista. Un controlador de vista puede ser a su vez padre e hijo de otros controladores de vista, lo que establece a su vez una jerarquía de controladores de vista.
Un controlador contenedor gestiona una jerarquía de vistas como un controlador normal. Además también puede añadir las vistas de sus controladores hijo como parte de la jerarquía de sus vistas. El controlador padre decide donde quiere poner la vista de su controlador y hijo y que tamaño tiene que tener. Por lo demás el controlador hijo es el responsable de gestionar su propia jerarquía de vistas.
Inicialización de un controlador de la vista
Cuando alguna parte de la aplicación pide la vista al controlador y ésta no está en memoria. El controlador la carga en memoria y la almacena en su propiedad view. Los pasos que ocurren en el proceso de carga son:
- El controlador llama al método loadView que carga la vista.
- El controlador llama a su método viewDidLoad que permite a la subclase hacer cualquier tipo de carga adicional.
Ambos loadView y viewDidLoad pueden ser sobrescritos para facilitar el comportamiento deseado por el controlador.

Creando vistas de forma programática
Para ellos, tendremos que sobreescribir el método loadView y en él. - Crear una vista raíz para el controlador.
- Crear vistas adicionales y añadirlas a la vista raíz.
- Asignar la vista raíz a la propiedad view del controlador.
Es importante no llamar a super loadView ya que esto lanza el comportamiento habitual y es un malgasto de recursos.
Soportando múltiples orientaciones de interfaz
Gracias al acelerómetro, las aplicaciones pueden conocer la orientación actual del dispositivo. Por defecto, una aplicación soporta orientación vertical y horizontal. Cuando ésta cambia, el dispositivo manda una notificación UIDeviceOrientationDidChangeNotification. Por defecto, UIKit recoge esta notificación y realiza los cambios pertinentes. Esto quiere decir que, excepto unas pocas excepciones, no necesitaríamos hacer nada más.
Cuando cambia la orientación, la ventana es redimensionada para encajar en la nueva orientación. La ventana también ajusta el el frame de su controlador raíz para coincidir con el nuevo tamaño. Por tanto, la forma más fácil de soportar múltiples orientaciones en nuestro controlador es configurar su jerarquía de vistas para que sus subvistas se actualicen cada vez que el frame de la vista raíz cambie.
Si no queremos el comportamiento por defecto, podemos controlar:
- Las orientaciones que queremos que soporte la app.
- Como una rotación entre dos orientaciones es animada en pantalla.
Ejemplos:
Sobreescribiendo supportedInterfaceOrientations podemos indicar las orientaciones soportadas:
-  (NSUInteger)supportedInterfaceOrientations{
    return (UIInterfaceOrientationMaskPortrait | UIInterfaceOrientationMaskPortraitUpsideDown);
}
Evitando que se auto-rote:
- (BOOL)shouldAutorotate
{
    return NO;
}
A veces tendremos un controlador cuyo contenido se vea mejor en cierta orientación. Aunque soporte otras orientaciones, queremos que al presentarse salga en esa. Para ello, deberemos sobreescribir el método preferredInterfaceOrientationForPresentation. Esta orientación debe estar incluida en las supportedInterfaceOrientations:
- (UIInterfaceOrientation)preferredInterfaceOrientationForPresentation{
    return UIInterfaceOrientationPortraitUpsideDown;
}
Presentando Controladores desde otros controladores
Cualquier tipo de controlador puede ser presentado por la aplicación. Sin embargo, solo deberíamos presentar nuevos controladores cuando queramos transmitir un significado específico sobre la relación de la jerarquía previa y la nueva presentada.
Cuando presentas un controlador modal, el sistema crea una relación entre el controlador que hizo la presentación y el presentado. El controlador presentador actualiza su propiedad presentedViewController con el controlador presentado y el presentado actualiza su propiedad presentingViewController con el presentador. Pasos a seguir.
- Crear el controlador a presentar.
- Establecer la propiedad modalTransitionStyle del controlador con el valor deseado.
- Asignar un delegate al view controller. Típicamente será el controlador presentador. El delegado será usado por el controlador presentado para informar al presentador cuando está listo para ser ocultado. También podría comunicar otra información.
- Llamar al método presentViewController:animated:completion pasando como argumento el controlador a presentar.
Un ejemplo, de un ViewController con un UIButton que al pulsar muestra otra vista con el efecto "Cover", además es delegado de ella y por tanto implementa el método para ocultar al segunda vista:
@interface IHViewController ()<IHPresentedViewControllerDelegate>
@property (nonatomic, strong) UIButton *btn1;
@property (nonatomic, strong) IHPresentedViewController * myViewController;
@end

...

- (void)exercise1
{
    self.btn1 = [UIButton buttonWithType:UIButtonTypeSystem];
    self.btn1.frame = CGRectMake(10, 10, 200, 30);
    [self.btn1 setTitle:@"Boton1" forState:UIControlStateNormal];
    [self.view addSubview:self.btn1];
    [self.btn1 addTarget:self action:@selector(transitionCover) forControlEvents:UIControlEventTouchUpInside];

}

...

- (void) transitionCover{
    self.myViewController = [[IHPresentedViewController alloc] init];
    self.myViewController.delegate = self;
    self.myViewController.modalTransitionStyle = UIModalTransitionStyleCoverVertical;
    [self presentViewController:self.myViewController animated:YES completion:nil];

    NSLog(@"cover");
}

...

- (void) dismissMe{
    [self.myViewController dismissViewControllerAnimated:YES completion:nil];
}
En el controlador delegado:
- (void)viewDidLoad
{
    [super viewDidLoad];

    self.btn1 = [UIButton buttonWithType:UIButtonTypeSystem];
    self.btn1.frame = CGRectMake(10, 10, 200, 30);
    [self.btn1 setTitle:@"Volver" forState:UIControlStateNormal];
    [self.view addSubview:self.btn1];
    [self.btn1 addTarget:self action:@selector(volverAtras) forControlEvents:UIControlEventTouchUpInside];

}

...

- (void) volverAtras{
    [self.delegate dismissMe];
}
Controladores contenedores
Son una parte vital del diseño de apps en iOS. Nos permiten descomponer la app en piezas más pequeñas y simples, cada una manejada por un controlador dedicado a esa tarea. Los contenedores permiten a esos controladores trabajar juntos para construir una interfaz impoluta.
iOS nos provee de contenedores standard como son UINavigationController o UITabBarController, sin embargo a veces necesitamos un flujo personalizado que no podemos encontrar en los controladores del sistema. Si necesitamos una organización especial de controladores hijos con una navegación especial o transiciones animadas de un tipo en particular, tendremos que crearnos uno personalizado.
Ejemplo: En un ViewController, añadir dos UIButton, uno para añadir una subvista con el fondo rojo y otro para eliminarla.
@property (nonatomic, strong) UIButton *btn1;
@property (nonatomic, strong) UIButton *btn2;
@property (nonatomic, strong) UIViewController *myViewController;

...

- (void)exercise1
{

    self.btn1 = [UIButton buttonWithType:UIButtonTypeSystem];
    self.btn1.frame = CGRectMake(10, 20, 200, 30);
    [self.btn1 setTitle:@"Boton1" forState:UIControlStateNormal];
    [self.view addSubview:self.btn1];
    [self.btn1 addTarget:self action:@selector(openChild) forControlEvents:UIControlEventTouchUpInside];

    self.btn2 = [UIButton buttonWithType:UIButtonTypeSystem];
    self.btn2.frame = CGRectMake(200, 20, 200, 30);
    [self.btn2 setTitle:@"Boton2" forState:UIControlStateNormal];
    [self.view addSubview:self.btn2];
    [self.btn2 addTarget:self action:@selector(closeChild) forControlEvents:UIControlEventTouchUpInside];

    self.myViewController = [[UIViewController alloc] init];
    self.myViewController.view.frame = CGRectMake(20, 100, 100, 100);
    [self.myViewController.view setBackgroundColor: [UIColor redColor]];
}

- (void) openChild{

    [self addChildViewController:self.myViewController];
    [self.view  addSubview:self.myViewController.view];
    [self.myViewController didMoveToParentViewController:self];
    NSLog(@"Entra");
}

- (void) closeChild{
    [self.myViewController willMoveToParentViewController:nil];
    [self.myViewController.view removeFromSuperview];
    [self.myViewController removeFromParentViewController];
    NSLog(@"Sale");
}
Arquitectura de Vistas
Un objeto UIView define una región rectangular de la pantalla que maneja los dibujos y loe eventos táctiles en esa región. Una vista puede también actuar como padre para otras vistas y coordinar el lugar y el tamaño de esas subvistas.
Cada vista tiene su correspondiente objeto "layer" que puede ser accedido con la propiedad layer de esa vista.
Las propiedades Frame, Bounds y Center
La propiedad Frame: contiene el rectángulo (tamaño y posición) que ocupa en el sistema de cordenadas de la vista padre.
La propiedad Bounds: contiene el rectángulo (tamaño y posición) que ocupa el contenido en el sistema de cordenadas de la propia vista.
La propiedad Center: representa el punto del central de la vista en el sistema de coordenadas del padre.
¿Como se crea una vista?
CGRect  viewRect = CGRectMake(0, 0, 100, 100);
UIView* myView = [[UIView alloc] initWithFrame:viewRect];
Ejemplo: Crear 3 subvistas, posicionarlas haciendo que se solapen y modificar el zIndex de alguna de ellas:
@property (nonatomic,strong) UIView *myFirstView;
@property (nonatomic,strong) UIView *mySecondView;
@property (nonatomic,strong) UIView *myThirdView;
...
self.myFirstView = [[UIView alloc] initWithFrame:CGRectMake(30, 30, 300, 240)];
[self.myFirstView setBackgroundColor:[UIColor redColor]];
[self.view addSubview:self.myFirstView];

self.mySecondView = [[UIView alloc] initWithFrame:CGRectMake(90, 90, 300, 240)];
[self.mySecondView setBackgroundColor:[UIColor blueColor]];
[self.view addSubview:self.mySecondView];
[self.view sendSubviewToBack: self.mySecondView];

self.myThirdView = [[UIView alloc] initWithFrame:CGRectMake(60, 60, 300, 240)];
[self.myThirdView setBackgroundColor:[UIColor yellowColor]];
[self.view addSubview:self.myThirdView];
[self.view insertSubview:self.myThirdView atIndex:1];
Otro ejemplo. Añadir una subvista que contenga una imagen que respete sus proporciones y rellene todo el rectángulo de la vista:
@property (nonatomic, strong) UIImageView * myFirstImageView;
...
myFirstImageView = [[UIImageView alloc] initWithImage:[UIImage imageNamed:@"guinness"]];
[myFirstImageView setFrame:CGRectMake(400, 400, 300, 240)];
[myFirstImageView setBackgroundColor:[UIColor lightGrayColor]];
[myFirstImageView setContentMode:UIViewContentModeScaleAspectFill];
[myFirstImageView setClipsToBounds:YES];
[self.view myFirstImageView];
Otro ejemplo: Modifica mediante una animación la opacidad, le ubicación y las dimensiones de la subvista anterior:
[UIView animateWithDuration:2.0 animations:^{
    self.myFirstImageView.alpha = 0.5;

    CGRect frame = self.myFirstImageView.frame;
    frame.origin.x=80;
    self.myFirstImageView.frame=frame;

    CGRect bounds = self.myFirstImageView.bounds;
    bounds.size.width=140;
    self.myFirstImageView.bounds=bounds;
}];
Otro ejemplo: Hacer que una subvista sea transparente mediante una animación, y cuando esta acabe se vuelva a mostrar:
[UIView animateWithDuration:1.0 animations:^{
    self.myView.alpha = 0;
} completion:^(BOOL finished) {
    self.myView.alpha = 1.0;
}];
Otro ejemplo: Rotar una subvista (UIImageView), controlando el ángulo con un UISlider:
@property (nonatomic, strong) UIImageView * myImageView;
@property (nonatomic, strong) UISlider * rotateSlider;

...

self.rotateSlider = [[UISlider alloc] initWithFrame:CGRectMake(400, 700, 300, 40)];
[self.rotateSlider setMaximumValue:M_PI];
[self.rotateSlider setMinimumValue:0];
[self.view addSubview:self.rotateSlider];
[self.rotateSlider addTarget:self action:@selector(rotateImage:) forControlEvents:UIControlEventValueChanged];

...

- (void)rotateImage: (UISlider *) slider{
    CGAffineTransform oneTransform = CGAffineTransformMakeRotation(slider.value);
    self.myImageView.transform = CGAffineTransformConcat(oneTransform);
}
Nuevo profesor
El jueves nos presentamos ante Ricardo Sanchez y empezamos viendo los UITableView.
UITableView
Estas vistas son, con diferencia, el componente iOS más popular llegando hasta el 94% de las apps, ya que pueden mostrar muchos recursos usando muy poca memoria.
Las TableView se componen de:
UITableCell's- Header y Footer de cada sección.
- Header y Footer de la propia TableView
- Datasource
- Delegate
UITableViewCell
Las celdas de una TableView pueden ser estáticas o dinámicas, hay diferentes estilos por defectos, pero son muy fácilmente customizables. Para su uso es necesario definir su "Reuse Identifier" y su posición en la tabla/sección viene definida por NSIndexPath.
UITableViewController
Son un tipo particular de UIViewController que incluyen el Delegate y Datasource de la tabla y además aportan más funcionalidades.
El Datasource exige la implementación de estos dos métodos:
- (NSInteger)tableView:(UITableView *)tableView numberOfRowsInSection:(NSInteger)section

- (UITableViewCell *)tableView:(UITableView *)tableView cellForRowAtIndexPath:(NSIndexPath *)indexPath
Es necesario también definir la vista UITableViewCell que se reusará, a través de su identificador:
- (id)dequeueReusableCellWithIdentifier:(NSString *)identifier forIndexPath:(NSIndexPath *)indexPath

Ejemplo de tabla con secciones:
Para este ejemplo vamos a usar un modelo, que contiene una lista de casas (Juego de Tronos) y cada casa tiene un listado de personas.
self.model = [[GotModel alloc] init];
[self.model cargaModelo];

...


- (NSInteger)numberOfSectionsInTableView:(UITableView *)tableView{
    return self.model.casas.count;
}

- (NSInteger)tableView:(UITableView *)tableView numberOfRowsInSection:(NSInteger)section
{
    Casa *casa = [self.model.casas objectAtIndex:section];
    return casa.personajes.count;
}

- (NSString *)tableView:(UITableView *)tableView titleForHeaderInSection:(NSInteger)section{
    Casa *casa = [self.model.casas objectAtIndex:section];
    return casa.nombre;
}

- (UITableViewCell *)tableView:(UITableView *)tableView cellForRowAtIndexPath:(NSIndexPath *)indexPath
{
    UITableViewCell *cell = [tableView dequeueReusableCellWithIdentifier:@"celdaPersonaje" forIndexPath:indexPath];
    Casa *casa = [self.model.casas objectAtIndex:indexPath.section];
    Personaje * personaje = [casa.personajes objectAtIndex:indexPath.row];
    cell.textLabel.text = personaje.nombre;
    cell.detailTextLabel.text = personaje.descripcion;
    return cell;
}
Customize cells
Para crear tu propia celda: - Crea tu clase que extienda de UITableViewCell - En el storyboard, indicas que la celda sea de la clase que hemos creado. - Ponemos que sea tipo custom y le ponemos un identificador. - Le metemos los elementos que queramos y creamos los outlet (En el .h de nuestra clase). - Por ultimo en nuestra UITableViewController:
- (UITableViewCell *)tableView:(UITableView *)tableView cellForRowAtIndexPath:(NSIndexPath *)indexPath
{
    MyTableViewCell *cell = [tableView dequeueReusableCellWithIdentifier:@"celdaPersonaje" forIndexPath:indexPath];
    Casa *casa = [self.model.casas objectAtIndex:indexPath.section];
    Personaje * personaje = [casa.personajes objectAtIndex:indexPath.row];
    cell.myLabel.text = personaje.nombre;
    cell.myImage.image = [UIImage imageNamed:personaje.imagen];
    return cell;

}
Para cambiar el alto de la celda:
- (CGFloat)tableView:(UITableView *)tableView heightForRowAtIndexPath:(NSIndexPath *)indexPath{
    return 70.0;
}
UITableViewDelegate
Para que cuando pinche en una celda que te lleve a otra vista con info. Y el nuevo controlador
@property (weak, nonatomic) IBOutlet UIImageView *myImagen;
@property (weak, nonatomic) IBOutlet UITextView *myTextArea;
@property (weak, nonatomic) Personaje* myPersonaje;

...

- (void)viewDidLoad
{
    [super viewDidLoad];
    // Do any additional setup after loading the view.

    self.myImagen.image = [UIImage imageNamed:self.myPersonaje.imagen];
    self.myTextArea.text = self.myPersonaje.descripcion;
    self.title = self.myPersonaje.nombre;
}
Creamo segue con un identificador mySegue:
- (void)tableView:(UITableView *)tableView didSelectRowAtIndexPath:(NSIndexPath *)indexPath{
    [self performSegueWithIdentifier:@"mySegue" sender:self];
}

- (void)prepareForSegue:(UIStoryboardSegue *)segue sender:(id)sender{
    if([segue.identifier  isEqual: @"mySegue"]){
        MySecondViewController* mySecondView = segue.destinationViewController;

        NSInteger casaId = self.tableView.indexPathForSelectedRow.section;
        Casa * casa = [self.model.casas objectAtIndex:casaId];

        NSInteger personajeId = self.tableView.indexPathForSelectedRow.row;
        Personaje* personaje = [casa.personajes objectAtIndex:personajeId];

        mySecondView.myPersonaje = personaje;

        NSLog(@"%d", personajeId);

    }

}
Cambiar el header de una section:
- (CGFloat)tableView:(UITableView *)tableView heightForHeaderInSection:(NSInteger)section{
    return 100.0;
}

- (UIView *)tableView:(UITableView *)tableView viewForHeaderInSection:(NSInteger)section{
    Casa * casa = [self.model.casas objectAtIndex:section];
    UIImage *logo = [UIImage imageNamed:casa.imagen];
    UIImageView* myImageSectionView = [[UIImageView alloc] initWithImage:logo];
    return myImageSectionView;
}
Borrar celdas
- (void)tableView:(UITableView *)tableView commitEditingStyle:(UITableViewCellEditingStyle)editingStyle forRowAtIndexPath:(NSIndexPath *)indexPath
{
    if (editingStyle == UITableViewCellEditingStyleDelete) {
        NSInteger casaId = indexPath.section;
        Casa * casa = [self.model.casas objectAtIndex:casaId];
        NSInteger personajeId = indexPath.row;
        NSMutableArray* myarray = [[NSMutableArray alloc] initWithArray:casa.personajes];

        [myarray removeObjectAtIndex:personajeId];

        casa.personajes = myarray;

        [self.tableView deleteRowsAtIndexPaths:@[indexPath] withRowAnimation:UITableViewRowAnimationAutomatic];


    }
}
Si llamamos "deleteRowsAtIndexPaths" antes que se cambie el modelo, falla, la solución es ponerlo despues en encapsular ese bloque de codigo entre:
[self.tableView beginUpdates];
...
[self.tableView endUpdates];
Mover Celdas
Para mover las celdas es neceario implementar estos dos métodos:
- (BOOL)tableView:(UITableView *)tableView canMoveRowAtIndexPath:(NSIndexPath *)indexPath{
    return YES;
}

- (void)tableView:(UITableView *)tableView moveRowAtIndexPath:(NSIndexPath *)sourceIndexPath toIndexPath:(NSIndexPath *)destinationIndexPath{

    // Aquí se implementa los cambios en el modelo.

}
UICollectionView
Son un tipo especial de UITableView que incluyen Layouts, inicialmente de tipo grid. Apple aporta un tipo de layout muy fácil de manejar, llamado UICollectionViewFlowLayout. Los layouts pueden ser cambiados dinámicamente.
Las CollectionViews se componen de:
- UICollectionViewCell
- SupplementaryViews
- DecoratorViews
Veamos el uso de estos componentes con un ejemplo:
Cells
Para definir las celdas de nuestro UICollectionView de ejemplo, vamos a crear una clase "CustomCell" que extienda de UICollectionViewCell con una propiedad pública del tipo UIImageView. En su método inicializador le añadimos características a la imagen:
self.myImage = [[UIImageView alloc] initWithFrame:self.bounds];
[self.myImage setContentMode:UIViewContentModeScaleAspectFill];
[self.myImage setClipsToBounds:YES];
[self addSubview:self.myImage];

...

- (void)layoutSubviews{
    [super layoutSubviews];
    self.myImage.frame = self.bounds;
}
En el UICollectionViewController, lo hacemos delegado de <UICollectionViewDataSource>, e implmentamos estos métodos:
@property (nonatomic, strong) UICollectionView *myCollectionView;
@property (nonatomic, strong) UICollectionViewFlowLayout * myCollectionViewLayout;

...

self.modelo = [[GotModel alloc] init];
[self.modelo cargaModelo];
self.myCollectionViewLayout = [[UICollectionViewFlowLayout alloc] init];
self.myCollectionViewLayout.itemSize = CGSizeMake(350, 80);
self.myCollectionViewLayout.sectionInset = UIEdgeInsetsMake(20, 20, 20, 20);
self.myCollectionViewLayout.minimumInteritemSpacing = 20;
self.myCollectionViewLayout.minimumLineSpacing = 20;
self.myCollectionViewLayout.scrollDirection = UICollectionViewScrollDirectionVertical;
self.myCollectionViewLayout.headerReferenceSize = CGSizeMake(self.myCollectionView.frame.size.width, 120);
self.myCollectionView = [[UICollectionView alloc] initWithFrame:self.view.bounds collectionViewLayout:self.myCollectionViewLayout];
self.myCollectionView.dataSource = self;
self.myCollectionView.delegate = self;
[self.myCollectionView setContentInset: UIEdgeInsetsMake(64, 0, 0, 0)];
[self.myCollectionView registerClass:[CustomCell class] forCellWithReuseIdentifier:@"cellIdent"];
[self.view addSubview:self.myCollectionView];

...

- (UICollectionViewCell *)collectionView:(UICollectionView *)collectionView cellForItemAtIndexPath:(NSIndexPath *)indexPath{

    CustomCell *cell = [self.myCollectionView dequeueReusableCellWithReuseIdentifier:@"cellIdent" forIndexPath:indexPath];
    Casa* casa = [self.modelo.casas objectAtIndex:indexPath.section];
    Personaje* personaje = [casa.personajes objectAtIndex:indexPath.row];
    UIImage * myCellImage =  [UIImage imageNamed:[NSString stringWithFormat:@"%@.jpg", personaje.imagen]];
    cell.myImage.image = myCellImage;
    return cell;
}

- (NSInteger)numberOfSectionsInCollectionView:(UICollectionView *)collectionView{
    return self.modelo.casas.count;
}

- (NSInteger)collectionView:(UICollectionView *)collectionView numberOfItemsInSection:(NSInteger)section{
    Casa* casa = [self.modelo.casas objectAtIndex:section];
    return casa.personajes.count;
}
Header
Para definir el header,
self.myCollectionViewLayout.headerReferenceSize = CGSizeMake(self.myCollectionView.frame.size.width, 30);

....

[self.myCollectionView registerClass:[UICollectionReusableView class] forSupplementaryViewOfKind:UICollectionElementKindSectionHeader withReuseIdentifier:@"headerIdent"];

...

- (UICollectionReusableView *)collectionView:(UICollectionView *)collectionView viewForSupplementaryElementOfKind:(NSString *)kind atIndexPath:(NSIndexPath *)indexPath{

    UICollectionReusableView* myHeaderView = [self.myCollectionView dequeueReusableSupplementaryViewOfKind:UICollectionElementKindSectionHeader withReuseIdentifier:@"headerIdent" forIndexPath:indexPath];

    myHeaderView.backgroundColor = [UIColor colorWithRed:0.9 green:0.9 blue:0.9 alpha:1];

    return myHeaderView;
}
Lo vamos a hacer pero con una subclase
- Creamos una clase de UICollectionReusableView (llamada por ejemplo CustomHeader)con un propiedad publica label:
@interface CustomHeader : UICollectionReusableView

@property (strong, nonatomic) UILabel * myLabel;

@end
Inicializamos el label;
self.myLabel = [[UILabel alloc] initWithFrame:CGRectMake(0, 0, self.frame.size.width, self.frame.size.height)];
self.myLabel.text = @"Hola";
[self.myLabel setTextAlignment:NSTextAlignmentCenter];
[self.myLabel setFont:[UIFont fontWithName:@"Helvetica" size:30.0]];
self.myLabel.textColor = [UIColor lightGrayColor];
[self addSubview:self.myLabel];
En el controlador principal:
#import "CustomHeader.h"

...

- (UICollectionReusableView *)collectionView:(UICollectionView *)collectionView viewForSupplementaryElementOfKind:(NSString *)kind atIndexPath:(NSIndexPath *)indexPath{

    CustomHeader* myHeaderView = [self.myCollectionView dequeueReusableSupplementaryViewOfKind:UICollectionElementKindSectionHeader withReuseIdentifier:@"headerIdent" forIndexPath:indexPath];

    myHeaderView.backgroundColor = [UIColor colorWithRed:0.9 green:0.9 blue:0.9 alpha:1];

    Casa* casa = [self.modelo.casas objectAtIndex:indexPath.section];

    myHeaderView.myLabel.text = casa.nombre;

    return myHeaderView;
}
Añadir segment control para elegir vertical u horizontal
- Creamos un segmen control, con storyboard y metemos IBoutlet y IBaction
- Creamos dos layouts:
@property (nonatomic, strong) UICollectionViewFlowLayout * myCollectionViewLayout;
@property (nonatomic, strong) UICollectionViewFlowLayout * myCollectionViewLayoutHorizontal;
Implementamos los cambios:
    self.myCollectionViewLayout = [[UICollectionViewFlowLayout alloc] init];
    self.myCollectionViewLayout.itemSize = CGSizeMake(100, 100);
    self.myCollectionViewLayout.sectionInset = UIEdgeInsetsMake(20, 20, 20, 20);
    self.myCollectionViewLayout.minimumInteritemSpacing = 20;
    self.myCollectionViewLayout.minimumLineSpacing = 20;
    self.myCollectionViewLayout.scrollDirection = UICollectionViewScrollDirectionVertical;
    self.myCollectionViewLayout.headerReferenceSize = CGSizeMake(self.myCollectionView.frame.size.width, 120);

    self.myCollectionViewLayoutHorizontal = [[UICollectionViewFlowLayout alloc] init];
    self.myCollectionViewLayoutHorizontal.itemSize = CGSizeMake(140, 140);
    self.myCollectionViewLayoutHorizontal.sectionInset = UIEdgeInsetsMake(20, 20, 20, 20);
    self.myCollectionViewLayoutHorizontal.minimumInteritemSpacing = 20;
    self.myCollectionViewLayoutHorizontal.minimumLineSpacing = 20;
    self.myCollectionViewLayoutHorizontal.scrollDirection = UICollectionViewScrollDirectionHorizontal;
    self.myCollectionViewLayoutHorizontal.headerReferenceSize = CGSizeMake(120,self.myCollectionView.frame.size.height);
En el ibaction del segmentcontrol controlo el valor:
- (IBAction)selectSegment:(id)sender {
    UISegmentedControl * segment = sender;

    if(segment.selectedSegmentIndex==0){
        [self.myCollectionView setCollectionViewLayout:self.myCollectionViewLayout animated:YES];
    }
    else{
        [self.myCollectionView setCollectionViewLayout:self.myCollectionViewLayoutHorizontal animated:YES];
    }

}
CollectionView Delegate: Seleccionar varios elementos para elimiarlos
Permitir el multiple selection:
self.myCollectionView.allowsMultipleSelection = YES;
Para cambiar el estilo de la celda seleccionada, implemento el cambio en su clase
- (void)setSelected:(BOOL)selected{
    [super setSelected:selected];

    if (selected) {
        [self.myImage setAlpha:0.5];
    }
    else{
        [self.myImage setAlpha:1.0];
    }
}
Creamos un IBAction del botón de borrar con este método:
- (IBAction)delete:(UIBarButtonItem *)sender {
    [self.myCollectionView performBatchUpdates:^{

        [self.myCollectionView deleteItemsAtIndexPaths: self.selectedItems ];

        for (int c = 0; c < self.modelo.casas.count; c++) {

            NSMutableIndexSet* indexSet = [[NSMutableIndexSet alloc] init];

            for(NSIndexPath * myIndexPath in self.selectedItems){
                if(myIndexPath.section == c){
                    NSLog(@"Entro");
                    [indexSet addIndex:myIndexPath.row];
                }

            }
            Casa* casa = [self.modelo.casas objectAtIndex:c];
            NSMutableArray* newList = casa.personajes.mutableCopy;
            [newList removeObjectsAtIndexes:indexSet];
            casa.personajes = newList.copy;
        }
        [self.selectedItems removeAllObjects];

    } completion:^(BOOL finished) {

    }];

}
No estuve presente en el último ejercicio de la semana. Queda pendiente.
Semana 3
Empezamos la semana con la presentación del que será nuestro profesor los próximos trés días, Victor Baro. Con él veremos tres temas importantes: Views, Drawing y Layers.
Para haces los ejercicios vamos a crear un proyecto que muestre los ejemplos que hacemos sobre estos tres temas, la única particularidad que hasta ahora no habíamos visto es la creación de varios storyboards y la instanciación de estos:
- (IBAction)GoDrawing:(id)sender {
    UIStoryboard * drawingSB = [UIStoryboard storyboardWithName:@"StoryboardDrawing" bundle:[NSBundle mainBundle]];
    UINavigationController * nextVC = [drawingSB instantiateViewControllerWithIdentifier:@"DrawingEntry"];
    [self presentViewController:nextVC animated:YES completion:nil];
}
Vistas
Las vistas son objetos de la clase UIView (o de alguna subclase de esta), y representa un área rectangular en el que el usuario puede interaccionar. Una vista está dentro de su supervista, solo una (UIView *) superview. Y puede contener multiples subvistas (NSArray *) subviews.
Para manipular la jerarquía de subvistas tenemos:
- insertSubview:atIndex:
- insertSubview:belowSubview:
- insertSubview:aboveSubview:
- exchangeSubviewAtIndex:withSubviewAtIndex:
- bringSubviewToFront:
- sendSubviewToBack:
Cuando una vista se mueve o se borra, sus subvistas también. Así como si nivel de transparencia, que se hereda. Con la propiedad de vista clipsToBounds, podemos establecer que las dimensiones de las subvistas sobresalgan o no de la vista.
Entendiendo CGRectInset
Crear una subvista del mismo tamaño que la vista pero dejándole 10 puntos de “margen” 
- (void) example01{
    CGRect blueViewFrame = CGRectMake(100, 100, 100, 200);
    UIView *blueView = [[UIView alloc] initWithFrame:blueViewFrame];
    blueView.backgroundColor = [UIColor blueColor];
    [self.view addSubview:blueView];

    CGRect greenViewFrame = CGRectInset(blueView.bounds, 10, 10);
    UIView *greenView = [[UIView alloc] initWithFrame:greenViewFrame];
    greenView.backgroundColor = [UIColor greenColor];
    [blueView addSubview:greenView];

}
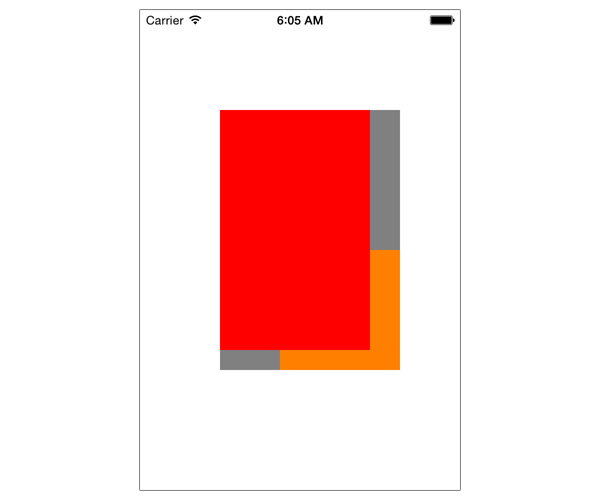
Entendiendo CGRectUnion
// CGRectUnion
CGRect frame1 = CGRectMake(80.0, 100.0, 150.0, 240.0);
CGRect frame2 = CGRectMake(140.0, 240.0, 120.0, 120.0);
CGRect frame3 = CGRectUnion(frame1, frame2);
UIView *view1 = [[UIView alloc] initWithFrame:frame1];
[view1 setBackgroundColor:[UIColor redColor]];
UIView *view2 = [[UIView alloc] initWithFrame:frame2];
[view2 setBackgroundColor:[UIColor orangeColor]];
UIView *view3 = [[UIView alloc] initWithFrame:frame3];
[view3 setBackgroundColor:[UIColor grayColor]];
[self.view addSubview:view3];
[self.view addSubview:view2];
[self.view addSubview:view1];
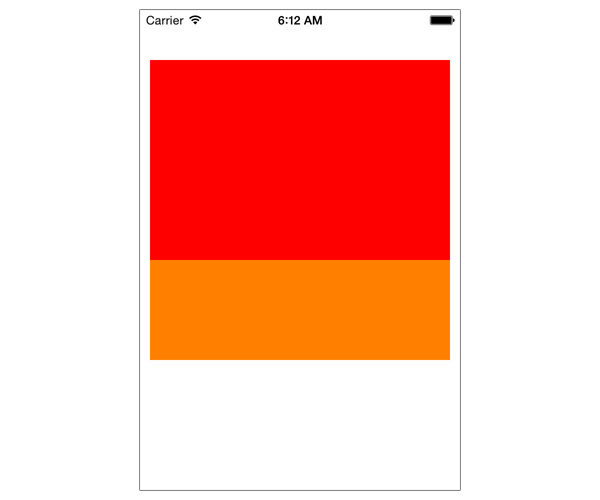
Entendiendo CGRectDivide
// CGRectDivide
CGRect frame = CGRectMake(10.0, 50.0, 300.0, 300.0);
CGRect part1;
CGRect part2;
CGRectDivide(frame, &part1, &part2, 100.0, CGRectMaxYEdge);

UIView *view1 = [[UIView alloc] initWithFrame:frame];
[view1 setBackgroundColor:[UIColor grayColor]];

UIView *view2 = [[UIView alloc] initWithFrame:part1];
[view2 setBackgroundColor:[UIColor orangeColor]];

UIView *view3 = [[UIView alloc] initWithFrame:part2];
[view3 setBackgroundColor:[UIColor redColor]];

[self.view addSubview:view1];
[self.view addSubview:view2];
[self.view addSubview:view3];
Transform
Las vistas pueden ser escaladas, rotadas y traladadas. Esto se hace con las transformaciones. Las transformaciones están definidas madiante la matriz de transformación
struct CGAffineTransform {
   CGFloat a;
   CGFloat b;
   CGFloat c;
   CGFloat d;
   CGFloat tx;
   CGFloat ty;
};


|  a   b   0  |
|  c   d   0  |
| tx  ty   1  |
A cada punto de la vista se le aplica la transformación según la matriz, siguiendo este calculo:
new x position = old x position * a + old y position * c + tx
new y position = old x position*b + old y position * d + ty
Para hacer transformaciones de una vista usando la matriz:
CGAffineTransformMake
CGAffineTransformMakeRotation
CGAffineTransformMakeScale
CGAffineTransformMakeTranslation
Para hacer modificaciones de una transformación:
CGAffineTransformTranslate
CGAffineTransformScale
CGAffineTransformRotate
CGAffineTransformInvert
CGAffineTransformConcat
Por ejemplo view.transform = CGAffineTransformMakeTranslation(2.0, 2.0); hace lo mismo que esto view.transform = CGAffineTransformTranslate(CGAffineTransformIdentity, 2.0, 2.0); ya que en el segundo caso estoy aplicando una transformación sobre CGAffineTransformIdentity que representa la matrix identidad sin cambios.
Para concatenar transformaciones, habría que usar lo métodos de modificación de transformaciones, estableciendo como transformación de partida la anterior:
view.transform = CGAffineTransformTranslate(view.transform, 5.0, 10.0);
view.transform = CGAffineTransformRotate(view.transform, degreesToRadians(45));
view.transform = CGAffineTransformScale(view.transform, 2.0, 2.0);
Ejercicio: Aplicar la transformación de la imagen a un rectángulo de 100x100

- (void) example03{
    CGRect blueViewFrame = CGRectMake(100, 100, 100, 100);
    UIView *blueView = [[UIView alloc] initWithFrame:blueViewFrame];
    blueView.backgroundColor = [UIColor blueColor];
    [self.view addSubview:blueView];
    blueView.transform = CGAffineTransformMake(1, 0, -0.4, 1, 0, 0);
}
Subclassing UIView
Como ejemplo de subclase de UIView vamos a crearnos nuestro propio botón MyButton personalizado. Vamos a encargarnos de implementar un método inicializador, del dibujado y de la respuesta a eventos:
@interface MyButton : UIView

@property (nonatomic, copy) NSString *title;

- (id) initWithFrame:(CGRect)frame title:(NSString *) theTitle color:(UIColor *) fillColor;

@end
En la implementación:
@property (nonatomic, strong) UIView * shadow;
...

- (id)initWithFrame:(CGRect)frame
{
    return [self initWithFrame:frame title:@"Button" color:[UIColor greenColor]];
}

- (id) initWithFrame:(CGRect)frame title:(NSString *) theTitle color:(UIColor *) fillColor{
    self = [super initWithFrame:frame];
    if(self){
        _title = theTitle;
        self.backgroundColor = fillColor;
        [self setup];
    }
    return self;
}


- (void) setup{
    UILabel *buttonTitle = [[UILabel alloc] initWithFrame:CGRectInset(self.bounds, 10, 10)];
    buttonTitle.text = self.title;
    buttonTitle.textColor = [UIColor whiteColor];
    buttonTitle.textAlignment = NSTextAlignmentCenter;
    [self addSubview:buttonTitle];

    CGFloat shadowHeight = 5;
    self.shadow = [[UIView alloc] initWithFrame:CGRectMake(0, self.bounds.size.height - shadowHeight, self.bounds.size.width, shadowHeight)];
    self.shadow.backgroundColor = [UIColor blackColor];
    self.shadow.alpha = 0.2;
    [self addSubview:self.shadow];

}
En el controlador principal creamos una instancia:
#import "MyButton.h"

...

-(void) example04{
    MyButton * myButton = [[MyButton alloc] initWithFrame:CGRectMake(20, 100, 240, 40) title:@"My Button 1" color:[UIColor colorWithRed:0.412 green:0.156 blue:0.350 alpha:1.000]];
    [self.view addSubview:myButton];
}

Para que responda a gestos, en el controllador de mi MyButton:
- (void)touchesBegan:(NSSet *)touches withEvent:(UIEvent *)event{
    self.shadow.frame = self.bounds;
    NSLog(@"Tocado");
}

- (void)touchesEnded:(NSSet *)touches withEvent:(UIEvent *)event{
    CGFloat shadowHeight = 5;
    self.shadow.frame = CGRectMake(0, self.bounds.size.height - shadowHeight, self.bounds.size.width, shadowHeight);
}
Gestos Multitáctiles
Para ver un ejemplo de gestos multitáctiles, vamos a hacer un ejercicio en el que nos creamos una subclase de UIView, por ejemplo MultipleTouchView, que permita los gestos multitáctiles y que dibuje un recuadro rojo en aquellos puntos que toquemos en la pantalla:
#import "MultipleTouchView.h"

@implementation MultipleTouchView

- (id)initWithFrame:(CGRect)frame
{
    self = [super initWithFrame:frame];
    if (self) {
        [self setMultipleTouchEnabled:YES];
    }
    return self;
}

- (void)touchesBegan:(NSSet *)touches withEvent:(UIEvent *)event{
    //Borramos lo que ya haya
    for (UIView *view in [self subviews]) {
        [view removeFromSuperview];
    }

    [touches enumerateObjectsUsingBlock:^(id obj, BOOL *stop) {
        UITouch *touch = obj;
        CGPoint touchPoint = [touch locationInView:self];

        UIView *touchView = [[UIView alloc] init];
        [touchView setBackgroundColor:[UIColor redColor]];
        touchView.frame = CGRectMake(touchPoint.x, touchPoint.y, 30, 30);
        [self addSubview:touchView];
    }];

}


@end
En nuestro controlador principal, lo instanciamos:
-(void) example05{
    MultipleTouchView * myMultipleTouchView = [[MultipleTouchView alloc] initWithFrame:self.view.bounds];
    [self.view addSubview:myMultipleTouchView];
}
Drag
Para entender como funciona el gesto de arrastrar, vamos a hacer un ejercicio. Consiste en crear una vista, que dibuje un recuadro rojo allá donde pulse y que se desplace por donde arrastre el dedo:
@property (nonatomic, strong) UIView * dragView;

...

- (id)initWithFrame:(CGRect)frame
{
    self = [super initWithFrame:frame];
    if (self) {

        [self setMultipleTouchEnabled:YES];
    }
    return self;
}

- (void)touchesBegan:(NSSet *)touches withEvent:(UIEvent *)event{
    if([touches count] == 1){
        UITouch *touch = [touches anyObject];
        CGPoint touchPoint = [touch locationInView:self];

        for(UIView * view in [self subviews]){
            if(CGRectContainsPoint(view.frame, touchPoint)){
                self.dragView = view;
                return;
            }
        }

        UIView *touchView = [[UIView alloc] init];
        [touchView setBackgroundColor:[UIColor redColor]];
        CGFloat size = 60;
        touchView.frame = CGRectMake(touchPoint.x - size/2, touchPoint.y - size/2, size, size);
        [self addSubview:touchView];
        self.dragView = touchView;

    }


}

- (void)touchesMoved:(NSSet *)touches withEvent:(UIEvent *)event{
    UITouch *touch = [touches anyObject];
    self.dragView.center = [touch locationInView:self];
}

- (void)touchesEnded:(NSSet *)touches withEvent:(UIEvent *)event{
    UITouch *touch = [touches anyObject];
    self.dragView.center = [touch locationInView:self];
}
Nota: Si pulso sobre un recuadro que ya existía, éste será el que se arrastre.
Autolayout:
Todo lo que necesitas saber de autolayouts aquí.
Cuando queremos animar una vista cuyas dimensiones vienen definidas por contrains, hay que hacer las animaciones sobre esas contrains.
Vamos a ver la manipulación de contrains por código.
Ejemplo, añadir un label a 100 punto de altura:
- (void) addLabels{
    UILabel * myLabel = [[UILabel alloc] initWithFrame:CGRectMake(0, 0, 200, 30)];
    myLabel.text = @"This is my label";
    myLabel.font = [UIFont systemFontOfSize:18];
    myLabel.backgroundColor = [UIColor lightGrayColor];
    myLabel.translatesAutoresizingMaskIntoConstraints = NO;
    [self.view addSubview:myLabel];

    [self.view addConstraints:[NSLayoutConstraint constraintsWithVisualFormat:@"V:|-offsetTop-[myLabel]" options:0 metrics:@{@"offsetTop": @100} views:NSDictionaryOfVariableBindings(myLabel)]];
}
Un label centrado respecto al padre:
- (void) addLabels{
    UILabel * myLabel = [[UILabel alloc] initWithFrame:CGRectMake(0, 0, 200, 30)];
    myLabel.text = @"This is my label";
    myLabel.font = [UIFont systemFontOfSize:18];
    myLabel.backgroundColor = [UIColor lightGrayColor];
    myLabel.translatesAutoresizingMaskIntoConstraints = NO;
    [self.view addSubview:myLabel];

    NSLayoutConstraint * unaConstrain = [NSLayoutConstraint constraintWithItem:myLabel
                                                                     attribute:NSLayoutAttributeCenterX
                                                                     relatedBy:NSLayoutRelationEqual
                                                                        toItem:self.view
                                                                     attribute:NSLayoutAttributeCenterX
                                                                    multiplier:1
                                                                      constant:0];

    [self.view addConstraint: unaConstrain];

}
Animando una constrain:
@property (nonatomic, strong) NSLayoutConstraint * myConstrain;

...

- (IBAction)anima:(id)sender {

    self.myConstrain = [NSLayoutConstraint constraintWithItem:self.myLabel
                                                    attribute:NSLayoutAttributeTop
                                                    relatedBy:NSLayoutRelationEqual
                                                       toItem:self.view
                                                    attribute:NSLayoutAttributeTop
                                                   multiplier:1
                                                     constant:150];

    [self.view addConstraint: self.myConstrain];

    [UIView animateWithDuration:0.5 animations:^{
        self.myConstrain.constant = 300;
        [self.view layoutIfNeeded];
    }];

}
Trucos:
Un truco rápido para modificar el valor de una constrain dependiendo de la orientación:
- Arrastra el constrain (de la lista de contrains) hacia el código.
- !!Poner codigo necesario!!
Un truco para fijar el ancho de varias vistas porcentualmente usando autolayout:
- Seleccionar ambos.
- Poner el mismo ancho: 0 puntos
- Y en el Multiplier poner la proporción, para 30% y 70% habría que poner
3/7
- Un trupo para usar autolayout en las scrollView:
- Poner el scrollView con las dimensiones que se necesite fijadas con contrains
- Crear una subvista de tipo
UIView, cuyas dimensiones determinarán elcontentSizedel scrollView.
Drawing
Siguiendo la estructura del proyecto de ayer, empezamos con los ejercicios de dibujado.
Ejercicio: Muestra un mosaico centrado con 3x3 repeticiones de un icono, centrado:

- (void) example01{
    UIImage *image = [UIImage imageNamed:@"Icon-60"];
    UIImage *imageTiled = [image resizableImageWithCapInsets:UIEdgeInsetsZero
                                                resizingMode:UIImageResizingModeTile];
    UIImageView *iView = [[UIImageView alloc]initWithImage:imageTiled];
    [self.view addSubview:iView];

    CGFloat alto = image.size.width * 3;
    iView.frame = CGRectMake(100, 200, alto, alto);
    iView.center = self.view.center;

}
Nota: Con CapInsets, estamos definiendo unos margenes, dentro del cual se establece el area que se repetirá con Tile.
Ejercicio: Repetir verticalmente la parte central del icono anterior

- (void) example02{
    UIImage *image = [UIImage imageNamed:@"Icon-60"];
    UIEdgeInsets miCorte = UIEdgeInsetsMake(30, 0, 29, 0);
    UIImage *imageTiled = [image resizableImageWithCapInsets:miCorte resizingMode:UIImageResizingModeTile];
    UIImageView *iView = [[UIImageView alloc]initWithImage:imageTiled];
    [self.view addSubview:iView];
    CGRect fr = iView.frame;
    fr.size.height *= 3;
    iView.frame = fr;
    iView.center = self.view.center;
}
Otra forma de hacer esta técnica “Slicing”, es usando la herramienta de Xcode

Si queremos crear una animación basada en varios fotogramas de imágenes:
 NSArray *imageNames = @[@"win_1.png", @"win_2.png", @"win_3.png", @"win_4.png",
                        @"win_5.png", @"win_6.png", @"win_7.png"];

NSMutableArray *images = [[NSMutableArray alloc] init];
for (int i = 0; i < imageNames.count; i++) {
    [images addObject:[UIImage imageNamed:[imageNames objectAtIndex:i]]];
}

UIImageView *animationImageView = [[UIImageView alloc] initWithFrame:CGRectMake(60, 95, 86, 193)];
animationImageView.animationImages = images;
animationImageView.animationDuration = 0.5;

[self.view addSubview:animationImageView];
[animationImageView startAnimating];
Ejemplo sacado de: http://www.appcoda.com/ios-programming-animation-uiimageview/
Contextos
Es la hoja de papel que usamos para dibujar.
Para UIImageView Cocoa nos da el contexto con el método - (void)drawRect:(CGRect)rect.
Tenemos dos herramientas UIKit y CoreGraphics:
- UIKit solo puede dibujar sobre el contexto actual.
- CoreGraphics es un kit completo de dibujo.
Ejercicio: Dibujar la mitad derecha del icono

- (void) example03{
    UIImage *image = [UIImage imageNamed:@"Icon-60"];
    CGSize size = CGSizeMake(image.size.width/2, image.size.height);
    UIGraphicsBeginImageContext(size);
    [image drawAtPoint:CGPointMake(-image.size.width/2, 0) ];
    UIImage *drawingImage = UIGraphicsGetImageFromCurrentImageContext();
    UIGraphicsEndImageContext();
    UIImageView *iView = [[UIImageView alloc]initWithImage:drawingImage];
    iView.center = self.view.center;
    [self.view addSubview:iView];
}
Blur
Se usan clases externas para hacer el efecto blur. Descargar aquí.
Ejercicio: Difuminar una captura de pantalla que simule que el efecto traslúcido:
@property (nonatomic, strong) UIImageView * screenShot;

...

- (IBAction)blur:(id)sender {
    [self presentBlurredScreenshot];

}

- (void) presentBlurredScreenshot{
    if (!self.screenShot){
        self.screenShot = [[UIImageView alloc] initWithFrame:self.view.frame];
    }
    self.screenShot.image =  [self blurredScreenshot];
    [self.navigationController.view addSubview:self.screenShot];
}


- (UIImage *) blurredScreenshot{
    UIGraphicsBeginImageContextWithOptions(self.view.bounds.size, NO, 0);
    [self.navigationController.view drawViewHierarchyInRect:self.view.frame afterScreenUpdates:NO];
    UIImage *snapshotImage = UIGraphicsGetImageFromCurrentImageContext();
    UIImage *blurredSnapshotImage = [snapshotImage applyLightEffect];
    UIGraphicsEndImageContext();
    return blurredSnapshotImage;
}
Filters
Pendiente. Mientras tanto leer esto.
UIBezierPath
Pendiente. Mientras tanto leer esto
Layers
Empezamos con un acercamiento a las capas. Nada como un ejercicio para comprender algunos conceptos:
Ejercicio del reloj: Consiste en dibujar una reloj cuya aguja gire cuando hacemos drag en la pantalla.

Solución:
- Creamos Arrow, subclase de
UIVIewy dibujamos la flecha con unUIBezierPath:
#import "Arrow.h"

@implementation Arrow

- (id)initWithFrame:(CGRect)frame
{
    self = [super initWithFrame:frame];
    if (self) {
        // Initialization code
        self.backgroundColor = [UIColor clearColor];
    }
    return self;
}

- (void)drawRect:(CGRect)rect
{
    // Drawing code
    UIBezierPath* p = [UIBezierPath bezierPath];
    [p moveToPoint:CGPointMake(20,100)];
    [p addLineToPoint:CGPointMake(20, 19)];
    [p setLineWidth:20];
    [p stroke];
    // point of the arrow
    [[UIColor colorWithRed:0.979 green:0.493 blue:0.174 alpha:1.000] set];
    [p removeAllPoints];
    [p moveToPoint:CGPointMake(0,25)];
    [p addLineToPoint:CGPointMake(20, 0)];
    [p addLineToPoint:CGPointMake(40, 25)];
    [p fill];
    // snip out triangle in the tail
    [p removeAllPoints];
    [p moveToPoint:CGPointMake(10,101)];
    [p addLineToPoint:CGPointMake(20, 90)];
    [p addLineToPoint:CGPointMake(30, 101)];
    [p fillWithBlendMode:kCGBlendModeClear alpha:1.0];
}
- Ahora creamos una clase Clock, también subclase de
UIView, que tenga un Arrow como propiedad:
...
@property (nonatomic, strong) Arrow * arrow;
...
- (id)initWithFrame:(CGRect)frame
{
    self = [super initWithFrame:frame];
    if (self) {
        // Initialization code
        [self addArrow];
        self.backgroundColor = [UIColor clearColor];
    }
    return self;
}

- (void) addArrow{
    self.arrow = [[Arrow alloc] initWithFrame:CGRectMake(0, 0, 40, 100)];
    [self addSubview:self.arrow];
    self.arrow.layer.anchorPoint = CGPointMake(0.5, 1);
    self.arrow.layer.position = self.center;
}
- Dibujamos el reloj:
- (void)drawRect:(CGRect)rect
{
    //// Color Declarations
    UIColor* color = [UIColor colorWithRed:0.683 green:0.798 blue:0.903 alpha:1.000];
    UIColor* color2 = [UIColor colorWithRed:0.979 green:0.493 blue:0.174 alpha:1.000];

    CGRect r = CGRectMake(0, 0, 300, 300);
    r.origin = CGPointMake(self.center.x - r.size.width/2, self.center.y - r.size.height/2);

    //// Oval Drawing
    UIBezierPath* ovalPath = [UIBezierPath bezierPathWithOvalInRect: r];
    [color setFill];
    [ovalPath fill];
    [color2 setStroke];
    ovalPath.lineWidth = 1;
    [ovalPath stroke];
}
- Y transformamos la capa de arrow dependiendo de los “touches”, gestos táctiles.
...
@interface Clock(){
    CGPoint _previousTouch;
}
...
- (void)touchesBegan:(NSSet *)touches withEvent:(UIEvent *)event{
    UITouch *touch = [touches anyObject];
    _previousTouch = [touch locationInView:self];
}

- (void)touchesMoved:(NSSet *)touches withEvent:(UIEvent *)event{
    UITouch *touch = [touches anyObject];

    CGPoint currentTouch = [touch locationInView:self];
    CGFloat amount = currentTouch.y - _previousTouch.y;

    self.arrow.layer.transform = CATransform3DRotate(self.arrow.layer.transform, amount*0.1, 0, 0, 1);

    _previousTouch = currentTouch;
    [self setNeedsDisplay];

}
CAScrollLayer
CAScrollLayer es un tipo especial de capa que muestra una porción de la vista que te permite mostrar otros puntos haciendo scroll.
Ejercicio: Crear un CAScrollLayer que tenga dos subvistas (UIImage) muestre una imagen y al pulsar un botón haga scroll de una a otra:

Solución:
- Añadimos dos propiedades, una CAScrollLayer y otro
@property (nonatomic, strong) CAScrollLayer * scrollLayer;
@property (weak, nonatomic) IBOutlet UIButton *myButton;
- Inicializamos el scroll layer y nos aseguramos que el botón siempre esté por encima:
self.scrollLayer  = [CAScrollLayer layer];
self.scrollLayer.bounds = CGRectMake(0, 0, self.view.bounds.size.width * 2,self.view.bounds.size.height);
self.scrollLayer.backgroundColor = [UIColor colorWithRed:0.533 green:1.000 blue:0.851 alpha:1.000].CGColor;
self.scrollLayer.anchorPoint = CGPointMake(0, 0);
self.scrollLayer.position = CGPointMake(0, 0);
[self.view.layer insertSublayer:self.scrollLayer below:self.myButton.layer];
- Añadimos las subvistas:
    CALayer *lay1 = [CALayer layer];
    UIImage *im1 = [UIImage imageNamed:@"dog"];
    lay1.bounds = CGRectMake(0, 0, 100, 100);
    lay1.contentsGravity = kCAGravityResizeAspectFill;
    lay1.position = CGPointMake(self.scrollLayer.bounds.size.width/4, self.scrollLayer.bounds.size.height/2);
    lay1.contents = (id)im1.CGImage;
    [self.scrollLayer addSublayer:lay1];

    CALayer *lay2 = [CALayer layer];
    UIImage *im2 = [UIImage imageNamed:@"programmer"];
    lay2.bounds = CGRectMake(0, 0, 100, 100);
    lay2.contentsGravity = kCAGravityResizeAspectFill;
    lay2.position = CGPointMake(3*self.scrollLayer.bounds.size.width/4, self.scrollLayer.bounds.size.height/2);
    lay2.contents = (id)im2.CGImage;
    [self.scrollLayer addSublayer:lay2];

    [self.scrollLayer scrollPoint:CGPointMake(0, 0)];
- Al botón le asignamos un
IBActionpara hacer scroll:
- (IBAction)goSwitch:(id)sender {

    if(self.myButton.tag == 0){
        [self.scrollLayer scrollToPoint:CGPointMake(self.view.bounds.size.width, 0)];
        self.myButton.tag = 1;
    }
    else{
        [self.scrollLayer scrollToPoint:CGPointMake(0, 0)];
        self.myButton.tag = 0;
    }

}
Una sencilla animación:
Ejercicio: Vamos a dibujar un UIBezierPath y vamos a animar su borde.

Solución:
CAShapeLayer *cLayer = [CAShapeLayer layer];
    cLayer.bounds = CGRectMake(0, 0, 100, 100);
    cLayer.path = [self drawPath].CGPath;
    cLayer.lineWidth = 3;
    cLayer.fillColor = [UIColor clearColor].CGColor;
    cLayer.strokeColor = [UIColor colorWithRed:0.976 green:1.000 blue:0.182 alpha:1.000].CGColor;
    cLayer.anchorPoint = CGPointMake(0.5, 0.5);
    cLayer.position = self.view.center;
    [self.scrollLayer addSublayer:cLayer];

    cLayer.strokeEnd = 1;

    CABasicAnimation *anim = [CABasicAnimation animationWithKeyPath:@"strokeEnd"];
    anim.duration = 2;
    anim.fromValue = @0.0;
    anim.toValue = @1;
    [cLayer addAnimation:anim forKey:@"stroke"];
Jugando con gradientes
Un ejercicio para colorear una capa con gradiente.

CAGradientLayer *gLayer = [CAGradientLayer layer];
gLayer.bounds = CGRectMake(0, 0, 200, 200);
gLayer.position = self.view.center;
gLayer.colors = @[(id)[UIColor colorWithRed:0.510 green:1.000 blue:0.147 alpha:1.000].CGColor,
                      (id)[UIColor colorWithRed:1.000 green:0.948 blue:0.172 alpha:1.000].CGColor,
                      (id)[UIColor colorWithRed:1.000 green:0.425 blue:0.122 alpha:1.000].CGColor];

gLayer.locations = @[ @0.0, @0.3, @1];
gLayer.startPoint = CGPointMake(0, 0);
gLayer.endPoint = CGPointMake(1, 1);
gLayer.type = @"radial";
[self.scrollLayer addSublayer:gLayer];
Animation
Encaramos unos ejercicios de animaciones de la mano de Ricardo Sanchez.
UIImageView Animation
Ejercicio: Dados una secuencia de imágenes/fotogramas componer una animación, que se inicie cuando se pulsa un botón y se para cuando se pulsa otro.

@property (weak, nonatomic) IBOutlet UIImageView *imageView;

...

NSMutableArray * aux = [[NSMutableArray alloc] init];

for (int i=1; i<=12; i++) {
    NSString *nombre = [NSString stringWithFormat:@"pollo%04d",i];
    UIImage *img = [UIImage imageNamed:nombre];
    [aux addObject:img];
}

self.imageView.animationImages = aux.copy;
self.imageView.animationDuration = 0.4;

...

[self.imageView startAnimating];

...

[self.imageView stopAnimating];
Ejercicio: Animar el color de fondo de un UIView:
self.myView = [[UIView alloc] initWithFrame:CGRectMake(40, 40, 100, 100)];
self.myView.backgroundColor = [UIColor redColor];
[self.view addSubview:self.myView];

[UIView animateWithDuration:2.0 animations:^{
    self.myView.layer.backgroundColor = [UIColor blueColor].CGColor;
}];
Ejercicio: Encadenar dos animaciones con completion:
- (void) buttonPressed{

    [UIView animateWithDuration:1.0 animations:^{

        self.myView.layer.bounds = CGRectMake(40, 40, 200, 200);
        self.myView.center = CGPointMake(140, 140);

    } completion:^(BOOL finished) {

        [UIView animateWithDuration:2.0 animations:^{
            self.myView.layer.backgroundColor = [UIColor blueColor].CGColor;

        }];

    }];

}
Opciones de animación:
UIViewAnimationOptionLayoutSubviewsUIViewAnimationOptionAllowUserInteractionUIViewAnimationOptionBeginFromCurrentStateUIViewAnimationOptionRepeatUIViewAnimationOptionAutoreverseUIViewAnimationOptionOverrideInheritedDurationUIViewAnimationOptionOverrideInheritedCurveUIViewAnimationOptionOverrideInheritedOptionsUIViewAnimationOptionAllowAnimatedContent
Curvas de animación:
UIViewAnimationOptionCurveEaseInOutUIViewAnimationOptionCurveEaseInUIViewAnimationOptionCurveEaseOutUIViewAnimationOptionCurveLinear
Transiciones
Las transiciones son animaciones predefinidas entre dos UIView con un padre común o dos estados de una sola UIView.
Tipos de transiciones:
- UIViewAnimationOptionTransitionNone
- UIViewAnimationOptionTransitionFlipFromLeft
- UIViewAnimationOptionTransitionFlipFromRight
- UIViewAnimationOptionTransitionCurlUp
- UIViewAnimationOptionTransitionCurlDown
- UIViewAnimationOptionTransitionCrossDissolve
- UIViewAnimationOptionTransitionFlipFromTop
- UIViewAnimationOptionTransitionFlipFromBottom
Ejercicio:

@property (weak, nonatomic) IBOutlet UIView *v1;
@property (weak, nonatomic) IBOutlet UIView *v2;
@property (weak, nonatomic) IBOutlet UIView *vparent;

...

[UIView transitionFromView:self.v1
                        toView:self.v2
                      duration:1.0
                       options:UIViewAnimationOptionTransitionFlipFromLeft|UIViewAnimationOptionShowHideTransitionViews
                    completion:^(BOOL finished) {

    self.v2.hidden = NO;
    self.v1.hidden = YES;

}];
Animaciones con keyframes:
Ejercicio: Añadiendo Keyframes a una animación, tenemos que conseguir rotar 360* una UIView.

- (void) gira360{

    CGFloat duration = 2.0;
    CGFloat pasos = 3.0;
    CGFloat intervalo = 1/pasos;
    NSLog(@"%f %f %f", duration, pasos, intervalo);

    [UIView animateKeyframesWithDuration:duration delay:0 options:UIViewKeyframeAnimationOptionCalculationModeCubic animations:^{

         for (int i = 0; i<pasos; i++) {
             CGFloat inicio = intervalo*i;
             [UIView addKeyframeWithRelativeStartTime:inicio relativeDuration:intervalo animations:^{
                 self.v1.transform = CGAffineTransformRotate(self.v1.transform,2*M_PI/pasos);
             }];
         }
     } completion:nil];

}
Core Animation
Animaciones de capas. Las siguientes propiedades:
anchorPoint borderColor borderWidth bounds contents contentsRect cornerRadius hidden mask masksToBounds opacity position shadowColor shadowOffset shadowOpacity shadowPath shadowRadius sublayers sublayerTransform transform zPosition
CABasicAnimation
Ejercicio:

- (void) ejercicio4{
    self.vparent.hidden = YES;


    self.cLayer1 = [CAShapeLayer layer];
    self.cLayer1.bounds = CGRectMake(0, 0, 100, 100);
    self.cLayer1.path = [self drawPath1].CGPath;
    self.cLayer1.lineWidth = 3;
    self.cLayer1.fillColor = [UIColor clearColor].CGColor;
    self.cLayer1.strokeColor = [UIColor colorWithRed:0.189 green:0.552 blue:0.808 alpha:1.000].CGColor;
    self.cLayer1.anchorPoint = CGPointMake(0, 0);
    self.cLayer1.position = CGPointMake(100, 100);
    [self.view.layer addSublayer:self.cLayer1];

    self.cLayer1.strokeEnd = 0;
    CABasicAnimation *anim = [CABasicAnimation animationWithKeyPath:@"strokeEnd"];
    anim.duration = 2;
    anim.beginTime = 0;
    anim.fromValue = @0.0;
    anim.toValue = @1.0;

    [self.cLayer1 addAnimation:anim forKey:@"stroke"];

}

- (UIBezierPath *) drawPath1{
    UIBezierPath* starPath = UIBezierPath.bezierPath;
    [starPath moveToPoint: CGPointMake(41, 15)];
    [starPath addLineToPoint: CGPointMake(51.58, 30.44)];
    [starPath addLineToPoint: CGPointMake(69.53, 35.73)];
    [starPath addLineToPoint: CGPointMake(58.12, 50.56)];
    [starPath addLineToPoint: CGPointMake(58.63, 69.27)];
    [starPath addLineToPoint: CGPointMake(41, 63)];
    [starPath addLineToPoint: CGPointMake(23.37, 69.27)];
    [starPath addLineToPoint: CGPointMake(23.88, 50.56)];
    [starPath addLineToPoint: CGPointMake(12.47, 35.73)];
    [starPath addLineToPoint: CGPointMake(30.42, 30.44)];
    [starPath closePath];
    [UIColor.grayColor setFill];

    return starPath;
}
CAKeyFrameAnimation
Animaciones con layers con keyframes:
- (void) buttonPressed5{
    self.cLayer1.position = CGPointMake(self.view.bounds.origin.x+50, self.view.bounds.origin.y+50);
    CAKeyframeAnimation *anim = [CAKeyframeAnimation animationWithKeyPath:@"position"];

    anim.values = @[[NSValue valueWithCGPoint:CGPointMake(self.view.bounds.origin.x+50, self.view.bounds.origin.y+50)],
                    [NSValue valueWithCGPoint:CGPointMake(self.view.bounds.size.width-50, self.view.bounds.origin.y+50)],
                    [NSValue valueWithCGPoint:CGPointMake(self.view.bounds.size.width-50, self.view.bounds.size.height-50)],
                    [NSValue valueWithCGPoint:CGPointMake(self.view.bounds.origin.x+50, self.view.bounds.size.height-50)],
                    [NSValue valueWithCGPoint:CGPointMake(self.view.bounds.origin.x+50, self.view.bounds.origin.y+50)]
                    ];

    anim.keyTimes = @[@0.05,@0.10,@0.15,@0.20,@1.0];
    anim.duration = 5;

    [self.cLayer1 addAnimation:anim forKey:@"position"];

}
CAKeyFrameAnimation con path
- (void) buttonPressed6{
    self.cLayer1.position = CGPointMake(self.view.bounds.origin.x+50, self.view.bounds.origin.y+50);
    CAKeyframeAnimation *anim = [CAKeyframeAnimation animationWithKeyPath:@"position"];

    UIBezierPath *mypath = [UIBezierPath bezierPathWithRect:CGRectInset(self.view.bounds, 50, 50)];


    UIBezierPath* starPath = UIBezierPath.bezierPath;
    [starPath moveToPoint: CGPointMake(20, 20)];
    [starPath addLineToPoint: CGPointMake(300, 0)];
    [starPath addLineToPoint: CGPointMake(300, 300)];
    [starPath addLineToPoint: CGPointMake(20, 320)];
    [starPath addLineToPoint: CGPointMake(20, 20)];
    [starPath closePath];

    anim.path = mypath.CGPath;
    anim.duration = 5;

    [self.cLayer1 addAnimation:anim forKey:@"position"];

}
CAAnimationGroup
Las animaciones se pueden agrupar con CAAnimationGroup:
- (void) buttonPressed4{

    CABasicAnimation *anim = [CABasicAnimation animationWithKeyPath:@"position"];
    anim.duration = 1;
    anim.fromValue = [NSValue valueWithCGPoint:CGPointMake(0, 0)];
    anim.toValue = [NSValue valueWithCGPoint:CGPointMake(100, 100)];
    self.cLayer1.position = CGPointMake(100, 100);
    [self.cLayer1 addAnimation:anim forKey:@"position"];

    CABasicAnimation *agranda = [CABasicAnimation animationWithKeyPath:@"transform"];
    agranda.duration = 1;
    agranda.fromValue = [NSValue valueWithCATransform3D:CATransform3DRotate(self.cLayer1.transform, 0, 0, 0, 1)];
    agranda.toValue = [NSValue valueWithCATransform3D:CATransform3DRotate(self.cLayer1.transform, 1, 0, 1, 1)];
    [self.cLayer1 addAnimation:agranda forKey:@"transform"];

    CAAnimationGroup *group = [CAAnimationGroup animation];
    group.duration = 1;
    group.animations = @[anim, agranda];

    [self.cLayer1 addAnimation:group forKey:nil];

}
Muy buen tutorial sobre Core Animation con ejemplos.
Animation Delegate
Hacemos ejemplo de animar la entrada y salida de un modal.

- Ponemos un ViewController con botón para ir al siguiente viewController:
- (IBAction)goFoward:(id)sender {

    SecondViewController * vc = [self.storyboard instantiateViewControllerWithIdentifier:@"secondVC"];
    vc.transitioningDelegate = self;
    [self presentViewController:vc animated:YES completion:nil];
}
- Para animar la transición, debemos indicar que el primer controlador implemente el delegado
UIViewControllerTransitioningDelegate. - Para definir el tipo de animación tenemos que implementar este método:
- (id<UIViewControllerAnimatedTransitioning>)animationControllerForPresentedController:(UIViewController *)presented presentingController:(UIViewController *)presenting sourceController:(UIViewController *)source{

    return [[animacion alloc] init];

}
- La animación la podemos crear como una clase NSObject que extienda a
UIViewControllerAnimatedTransitioning:
@interface animacion () <UIViewControllerAnimatedTransitioning>
- Con estos dos métodos que crea la animación y la duración:
- (void)animateTransition:(id<UIViewControllerContextTransitioning>)transitionContext{

    UIViewController * mycontroller = [transitionContext viewControllerForKey:UITransitionContextFromViewControllerKey];
    UIViewController * tocontroller = [transitionContext viewControllerForKey:UITransitionContextToViewControllerKey];


    [[transitionContext containerView] insertSubview:tocontroller.view atIndex:100];
    tocontroller.view.layer.position = CGPointMake(500,500);
    tocontroller.view.alpha = 0;
    [UIView animateWithDuration:1.0 animations:^{
        tocontroller.view.layer.position = CGPointMake([transitionContext containerView].center.x, [transitionContext containerView].center.y);
        tocontroller.view.alpha = 1;
    } completion:^(BOOL finished) {
        [transitionContext completeTransition:YES];
    }];

}

- (NSTimeInterval)transitionDuration:(id<UIViewControllerContextTransitioning>)transitionContext{
    return 1.0;

}
Para hacer la animación con TabBar o NavigationController es más sencillo:

- Al UITabBarViewController sea delegado de
<UITabBarControllerDelegate> - Implementa el siguiente método:
- (id<UIViewControllerAnimatedTransitioning>)tabBarController:(UITabBarController *)tabBarController animationControllerForTransitionFromViewController:(UIViewController *)fromVC toViewController:(UIViewController *)toVC{
    return [[animacion alloc] init];
}
Gestures Recognizers
Ejercicio: Al hacer tap en la pantalla, un cohete se desplaza haciendo animación.
- Añado el gesto en el controlador:
- (void)viewDidLoad
{
    [super viewDidLoad];
    UITapGestureRecognizer * mygesto = [[UITapGestureRecognizer alloc] initWithTarget:self action:@selector(move:)];
    [self.view addGestureRecognizer:mygesto];

}
- Implemento el método que haga la animación:
- (void) move: (UIGestureRecognizer*) gesto{

    [UIView animateWithDuration:1 animations:^{
        self.rocket.layer.position = [gesto locationInView:self.view];
    }];

}
Ejercicios, escalar una imagen usando gestos Pinch, que al soltar recupere el tamaño normal de la imagen:
- (void)viewDidLoad
{
    [super viewDidLoad];

    self.rocket.bounds = CGRectMake(0, 0, 100, 100);
    self.rocket.center = self.view.center;

    UIPinchGestureRecognizer * myPinch = [[UIPinchGestureRecognizer alloc] initWithTarget:self action:@selector(zoom:)];
    [self.view addGestureRecognizer:myPinch];

}

- (void) zoom: (UIPinchGestureRecognizer*) gesto{

    self.rocket.bounds = CGRectMake(0, 0, gesto.scale*100, gesto.scale*100);
    self.rocket.center = self.view.center;

    if (gesto.state== UIGestureRecognizerStateEnded) {

        [UIView animateWithDuration:0.5 animations:^{
            self.rocket.bounds = CGRectMake(0, 0, 100, 100);
        }];

    }
}
Comprobar que el tap no es un double tap. Ejercicio, hacer dos acciones dependiendo si es tap o double tap:
- (void)viewDidLoad
{
    [super viewDidLoad];

    UITapGestureRecognizer * mygesto = [[UITapGestureRecognizer alloc] initWithTarget:self action:@selector(choose:)];
    [self.view addGestureRecognizer:mygesto];

    UITapGestureRecognizer * mygesto2 = [[UITapGestureRecognizer alloc] initWithTarget:self action:@selector(choose2:)];
    mygesto2.numberOfTapsRequired = 2;
    [self.view addGestureRecognizer:mygesto2];

    [mygesto requireGestureRecognizerToFail:mygesto2];

}

- (void) choose: (UITapGestureRecognizer*) gesto{
    NSLog(@"tap");
}

- (void) choose2: (UITapGestureRecognizer*) gesto{
    NSLog(@"double tap");
}
Dobles gestos reconocidos:
@interface RocketViewController () <UIGestureRecognizerDelegate>

...

- (void)viewDidLoad
{
    [super viewDidLoad];

    UIPinchGestureRecognizer * myPinch = [[UIPinchGestureRecognizer alloc] initWithTarget:self action:@selector(zoom:)];
    [self.view addGestureRecognizer:myPinch];
    myPinch.delegate = self;

    UIRotationGestureRecognizer * myRotate = [[UIRotationGestureRecognizer alloc] initWithTarget:self action:@selector(rotate:)];
    [self.view addGestureRecognizer:myRotate];

}

- (void) zoom: (UIPinchGestureRecognizer*) gesto{
    self.rocket.transform = CGAffineTransformScale(self.rocket.transform,gesto.scale, gesto.scale);
    gesto.scale = 1;
}

- (void) rotate: (UIRotationGestureRecognizer*) gesto{
    self.rocket.transform = CGAffineTransformRotate(self.rocket.transform, gesto.rotation);
    gesto.rotation = 0;
}
Semana 4
Empezamos la semana con la presentación de un nuevo profesor: Daniel García.
Modelos
Creamos una clase TVshow y otra Movie, con propiedades, que cumpla NSCopying e implementamos (id)copyWithZone:(NSZone *)zone.
@interface TVshow : NSObject<NSCopying, NSCoding>
@property (nonatomic, copy) NSString* id;
@property (nonatomic, copy) NSString* title;
@property (nonatomic, copy) NSString* description;
@property (nonatomic, assign) CGFloat rating;
@end
Nota: por que algunas property es strong/copy. Cuando una propiedad de una entidad tiene versión mutable, debería usar copy y no strong.
- (id)copyWithZone:(NSZone *)zone{
    Movie * movieCopy = [[[self class] allocWithZone:zone] init];
    if(movieCopy){
        //Objects
        movieCopy.id = [self.id copyWithZone:zone];
        movieCopy.title = [self.title copyWithZone:zone];
        movieCopy.description = [self.description copyWithZone:zone];

        //Scalars
        movieCopy.rating = self.rating;
    }
    return movieCopy;
}
Y un ejemplo de cómo se copiaría el ultimo elemento del array:
- (IBAction)copyLast:(id)sender {

    if([self.myshows count] > 0){
        TVshow * copyshow = [[self.myshows lastObject] copy];
        [self.myshows addObject:copyshow];
        [self.tableView reloadData];
    }

}
Y también implementa el protocolo NSCoding, si quisiera guardar ciertos objetos en disco.
- (id)initWithCoder:(NSCoder *)aDecoder{
    self = [super init];
    if(self) {
        _id = [aDecoder decodeObjectForKey:@"id"];
        _title = [aDecoder decodeObjectForKey:@"title"];
        _description = [aDecoder decodeObjectForKey:@"description"];
        _rating = [aDecoder decodeIntegerForKey:@"rating"];
    }
    return self;
}


- (void)encodeWithCoder:(NSCoder *)aCoder{
    [aCoder encodeObject:self.id forKey:@"id"];
    [aCoder encodeObject:self.title forKey:@"title"];
    [aCoder encodeObject:self.description forKey:@"description"];
    [aCoder encodeInteger:self.rating forKey:@"rating"];
}
Y un ejemplo de cómo se guardaría en disco:
static NSString * const savedShowsFileName=@"shows";

...

- (void) save{
    NSArray *paths = NSSearchPathForDirectoriesInDomains(NSCachesDirectory, NSUserDomainMask, YES);
    NSString * documentsDirectory = [paths objectAtIndex:0];
    NSString * myfilename = [documentsDirectory stringByAppendingString:savedShowsFileName];

    if (self.myshows.count) {
        [NSKeyedArchiver archiveRootObject:self.myshows toFile:myfilename];
    }
}
Comparación
Para comparar tenemos que usar algunas buenas practicas:
1.- isEqualTo[misma clase] donde definimos los criterios que queramos que sean estudiados para saber si es igual.
- (BOOL)isEqualToTVshow:(TVshow *)show{
    if(![self.id isEqualToString:show.id]){
        return NO;
    }
    return YES;
}
2.- isEqual, comprobar si no es el mismo objeto, si es de otro tipo y luego llamar al metodo anterior.
- (BOOL)isEqual:(TVshow *)show{
    if(self == show){
        return YES;
    }
    if(![show isKindOfClass:[self class]]){
        return NO;
    }
    return [self isEqualToTVshow:show];
}
hashhash is a unique identifier (NSUInteger)
- (NSUInteger)hash{
    return [_id hash];
}
Lo mismo pero usando Mantle:
Explicar qué es mantle.
En nuestra clase, que sea subclase de MTLModel
#import <Foundation/Foundation.h>
#import <Mantle/Mantle.h>

@interface TVshow : MTLModel
@property (nonatomic, copy) NSString* id;
@property (nonatomic, copy) NSString* title;
@property (nonatomic, copy) NSString* description;
@property (nonatomic, assign) CGFloat rating;
@end
Serializar un JSON con Mantle
Tenemos que implementar el método de clase:
+ (NSDictionary *)JSONKeyPathsByPropertyKey {
    return @{
             @"id": @"id",
             @"title": @"title",
             @"description": @"description"
             };
}
Y desde donde quiera parsear el JSON y convertirlo a objetos:
- (id)initWithCoder:(NSCoder *)aDecoder{

    self = [super initWithCoder:aDecoder];
    if (self) {
        self.title = @"Series";
        _myshows = [NSMutableArray array];


        NSURL * jsonURL = [NSURL URLWithString:@"http://ironhack4thweek.s3.amazonaws.com/shows.json"];
        NSData * seriesData = [NSData dataWithContentsOfURL:jsonURL];
        NSError * error;
        NSDictionary * JSONDictionary = [NSJSONSerialization JSONObjectWithData:seriesData options:NSJSONReadingMutableContainers error:&error];

        for (NSDictionary * tvshowDictionary in [JSONDictionary valueForKey:@"shows"]) {
            NSError * parseError;
            TVshow * showItem = [MTLJSONAdapter modelOfClass:[TVshow class] fromJSONDictionary:tvshowDictionary error:&parseError];
            [_myshows addObject:showItem];

        }


    }
    return self;
}
Persistencia
Core Data
Es un framework que nos facilita Apple, y que por debajo realmente utiliza SQL Lite, pero contamos con una serie de herramientas que nos facilita tanto la creación del modelo como su gestión posterior desde código.
Core Data se apoya en tres conceptos básicos:
- Managed Object Model: definición del modelo de datos.
- Persistent Storage Coordinator: es el encargado de persistir la información.
- Managed Object Context: “memoria temporal” donde poder trabajar antes de realizar la persistencia.
Ejemplo de proyecto que use core data:
- Añade al proyecto el framework

- Importa coredata en el prefix.pch
#ifdef __OBJC__
    #import <UIKit/UIKit.h>
    #import <Foundation/Foundation.h>
    #import <CoreData/CoreData.h>
#endif
- Vamos a crear una clase llamada “CoreDataManager”, que encapsule los métodos y propiedades que gestionen Core Data:

- En el .h creamos un contexto
NSManagedObjectContexty el designated initializer:
@interface CoreDataManager : NSObject
@property (readonly, strong, nonatomic) NSManagedObjectContext *managedObjectContext;
- (instancetype)initWithModelName:(NSString *)modelName;
@end
- En el .m crea propiedades privadas que pueden ser escritas:
@interface CoreDataManager ()
@property (readwrite, strong, nonatomic) NSManagedObjectContext *managedObjectContext;
@property (readwrite, strong, nonatomic) NSManagedObjectModel *managedObjectModel;
@property (readwrite, strong, nonatomic) NSPersistentStoreCoordinator *persistentStoreCoordinator;
@end
- Y contendrá las implementaciones de estos métodos (copiados del AppDelegate.m):
- (void)saveContext
- (NSManagedObjectContext *)managedObjectContext
- (NSManagedObjectModel *)managedObjectModel
- (NSPersistentStoreCoordinator *)persistentStoreCoordinator
- (NSURL *)applicationDocumentsDirectory
- Sin olvidar los métodos inicializadores:
- (instancetype)init
{
    return [self initWithModelName:nil];
}

- (instancetype)initWithModelName:(NSString *)modelName
{
    NSAssert(modelName, @"Model name is requered");
    self = [super init];
    if (self) {
        _modelName = modelName;
    }
    return self;
}
Para este ejemplo vamos a crear una entidad userEntity para usarla en un sistema de autenticación:
- Nos creamos un core data model
- Creamos la entidad userEntity
- Le metemos atributos
%2010.58.39.png)
- Creamos las clases:
%2010.58.39.png)
- Desde los controladores que usarán Core Data, se importa usando “Inyección de dependencias”:
#import "CoreDataManager.h"
#import "UserEntity.h"

...

@property (strong, nonatomic) CoreDataManager * coreDataManager;

...

- (id)initWithCoder:(NSCoder *)aDecoder
{
    self = [super initWithCoder:aDecoder];
    if (self) {
        _coreDataManager = [[CoreDataManager alloc] initWithModelName:@"Shows"];

    }
    return self;
}
¿Cómo se usa?
Crear entidad:
NSManagedObjectContext *managedObjectContext=[[NSManagedObjectContext alloc]init];
UserEntity *user = [NSEntityDescription insertNewObjectForEntityForName:@"UserEntity"
inManagedObjectContext:managedObjectContext];
user.userId=@"1";
user.userName=@"John Appleseed";

NSError *error;
[managedObjectContext save:&error];
Leer entidad:
- (UserEntity *)userWithId:(NSString *)userId
inManagedObjectContext:(NSManagedObjectContext*)managedObjectContext{

    NSFetchRequest *fetchRequest = [NSFetchRequest fetchRequestWithEntityName:@"UserEntity"];
    fetchRequest.predicate = [NSPredicate predicateWithFormat:@“userName = %@“, userId];
    NSError *error;
    NSArray *fetchResult=[managedObjectContext executeFetchRequest:fetchRequest error:&error];
    return fetchResult.count?[fetchResult firstObject]:nil;

}
Editar entidad:
NSManagedObjectContext *managedObjectContext=[[NSManagedObjectContext alloc]init];
UserEntity *user = [self userWithId:@"1" inManagedObjectContext:managedObjectContext];

user.name=@"John Doe";

NSError *error;
[managedObjectContext save:&error];
Eliminar entidad:
NSManagedObjectContext *managedObjectContext=[[NSManagedObjectContext alloc]init];
UserEntity *user = [self userWithId:@"1" inManagedObjectContext:managedObjectContext];

[managedObjectContext deleteObject:user];

NSError *error;
[managedObjectContext save:&error];
NSUserDefaults
Podemos almacenar simples preferencias de usuario utilizando tipos de datos como NSString o NSInteger.
Escribir en NSUserDefaults
NSString *currentLang=@"es";
[[NSUserDefaults standardUserDefaults]setObject:currentLanguage forKey:@"userConfigCurrentLang"];
Los objetos deben ser NSData, NSString, NSNumber, NSDate, NSArray o NSDictionary.
Otros métodos para esciribr en NSUserDefaults:
- setBool:forKey:
- setFloat:forKey:
- setInteger:forKey:
- setDouble:forKey:
- setURL:forKey:
Leer de NSUserDefaults
NSString *currentLang;
currentLang = [[NSUserDefaults standardUserDefaults] objectForKey:@"userConfigCurrentLang"];
Otros métodos para leer de NSUserDefaults:
- arrayForKey:
- boolForKey:
- dataForKey:
- dictionaryForKey:
- floatForKey:
- integerForKey:
Sincronizar NSUserDefaults
[[NSUserDefaults standardUserDefaults] synchronize];
Plist (Property List)
Son archivos que almacenan objetos serializados, se utilizan frecuentemente para almacenar configuraciones del usuario y no puede contener más que objetos de tipo Core Foundation o Foundation Kit porque la biblioteca no permite serializar otros tipos de objetos: NSArray, NSDictionary, NSString, NSData, NSDate y NSNumber.
Leer de plist
NSURL *plistURL;
NSDictionary *plistData = [NSDictionary dictionaryWithContentsOfURL:plistURL];

NSString *plistFilePath;
NSDictionary *plistData = [NSDictionary dictionaryWithContentsOfFile:plistFilePath];
Escribir plist
NSDictionary *plistData;
NSString *plistFilePath;
[plistData writeToFile:plistFilePath atomically:YES];
NSFileManager
El framework foundation nos da acceso al sistema de ficheros para realizar operaciones básicas sobre archivos y directorios. Ese acceso nos viene dado por NSFileManager y sus métodos incluyen la capacidad de:
- Crear un archivo nuevo
- Leer desde un archivo creado
- Escribir datos en un archivo
- Renombrar un archivo
- Comprobar si existe un archivo
- Borrar un archivo
- Listar archivos de un directorio
Comprobar si existe un archivo
NSFileManager *fileManager = [NSFileManager defaultManager];
NSString *documentsPath = [NSSearchPathForDirectoriesInDomains(NSDocumentDirectory, NSUserDomainMask, YES) firstObject];
NSString *filePath = [documentsPath stringByAppendingPathComponent:@"file.txt"];
BOOL fileExists = [fileManager fileExistsAtPath:filePath];
Borrar un archivo
NSFileManager *fileManager = [NSFileManager defaultManager];
NSString *documentsPath;
NSString *filePath = [documentsPath stringByAppendingPathComponent:@"image.png"];

NSError *error = nil;
if (![fileManager removeItemAtPath:filePath error:&error]) {
    NSLog(@"[Error] %@ (%@)", error, filePath);
}
Listar archivos de un directorio
NSFileManager *fileManager = [NSFileManager defaultManager];
NSURL *bundleURL = [[NSBundle mainBundle] bundleURL];
NSArray *contents = [fileManager contentsOfDirectoryAtURL:bundleURL
                               includingPropertiesForKeys:@[]
                                                  options:NSDirectoryEnumerationSkipsHiddenFiles
                                                    error:nil];

NSPredicate *predicate = [NSPredicate predicateWithFormat:@"pathExtension == 'png'"];
for (NSURL *fileURL in [contents filteredArrayUsingPredicate:predicate]) {
    // Enumerate each .png file in directory
}
Crear nuevo directorio
NSFileManager *fileManager = [NSFileManager defaultManager];
NSString *documentsPath;
NSString *imagesPath = [documentsPath stringByAppendingPathComponent:@"images"];
if (![fileManager fileExistsAtPath:imagesPath]) {
    [fileManager createDirectoryAtPath:imagesPath
           withIntermediateDirectories:NO attributes:nil error:nil];
}
Leer atributos de un archivo
NSFileManager *fileManager = [NSFileManager defaultManager];
NSString *documentsPath;
NSString *filePath = [documentsPath stringByAppendingPathComponent:@"Document.pages"];

if ([fileManager fileExistsAtPath:filePath]) {
    NSDictionary *attributes = [fileManager attributesOfItemAtPath:filePath error:nil];
}
Bloques
Los bloques en Objective C y Smalltalk son “trozos” de código que se pueden guardar en variables, pasar como argumentos, devolver como resultado de un mensaje y ejecutar posteriormente. Es decir, son en el fondo funciones de primer nivel (como en Lisp o cualquier lenguaje funcional), con una sintaxis algo distinta que recuerda los punteros a funciones de C.
Sin embargo, si sólo se tratase de eso, alguien podría decir que los bloques en Objective C son redundantes, ya que con punteros a funciones, se puede hacer todo eso en C de toda la vida, aunque resulte más farragoso y proclive a errores. Los bloques tiene algo más: capturan de forma automática el entorno léxico en el que han sido creados.
Esto quiere decir que si en un método definimos una variable cualquiera (digamos int i = 42) y luego definimos un bloque, dicho bloque podrá hacer referencia a dicha variable. Si pasamos ese bloque a otro objeto, seguirá pudiendo hacer referencia a dicha variable y su valor original. Más adelante veremos eso con más detalle, y su utilidad.
Anatomía de bloques
[UIView animateWithDuration:0.3 animations:^{
        self.alpha=0.0;
} completion:^(BOOL finished) {

}];
¿Cómo se declaran?
- Como variable local:
returnType (^blockName)(parameterTypes) = ^returnType(parameters) {...};
- Como propiedad:
@property (nonatomic, copy) returnType (^blockName)(parameterTypes);
- Como parámetro:
- (void)someMethodThatTakesABlock:(returnType (^)(parameterTypes))blockName;
- Como argumento en la llamada a un método:
[someObject someMethodThatTakesABlock: ^returnType (parameters) {...}];
- Como typedef:
typedef returnType (^TypeName)(parameterTypes);
TypeName blockName = ^returnType(parameters) {...};
Memoria
Los objetos referenciados dentro de un bloque son automáticamente retenidos por el bloque:
- (void)updateHomeTownForUser:(UserEntity *)user{
    NSDate *requestDate=[NSDate date];
    [self.requestManager homeTownForUser:user completion:^(CityEntity *resultCity){
        user.hometown=resultCity;
        user.lastHometownUpdate=requestDate;
    }];
}
requestDate and user are retained by the block
Misma dirección de memoria pero diferentes puntero en la pila
NSDate *requestDate=[NSDate date]; /// 0x000001
[self.requestManager homeTownForUser:user completion:^(CityEntity *resultCity){
    user.lastHometownUpdate=requestDate; /// 0x000005
}];
Aunque los escalares y estructuras (NSInteger,CGFloat,CGRect,…) referenciados dentro del bloque se copian
Bloques ≈ Objetos
Un bloque se puede comportar como un objeto pero nunca lo retenemos, lo copiamos:
@interface UserFetcher()
@property (nonatomic, copy) void (^fetchUsersCallback)();
@end
- (void)fetchUsersWithCompletionBlock:(void (^)())completion{
    self.fetchUsersCallback=completion;
}
Ejemplo de uso: Crear un botón subclase de UIBarButtonItem, con un método inicializador que reciba un bloque que deba ser ejecutado en su action:
En el .h
#import <UIKit/UIKit.h>

typedef void (^barButtonItemBlock)();

@interface BlockButtonItem : UIBarButtonItem

- (instancetype)initWithTitle: (NSString *) title block: (barButtonItemBlock)block;

@end
En el .m
#import "BlockButtonItem.h"
@interface BlockButtonItem ()
@property (copy, nonatomic) barButtonItemBlock block;
@end

@implementation BlockButtonItem

- (instancetype)initWithTitle: (NSString *) title block: (barButtonItemBlock)block
{
    self = [super initWithTitle:title style:UIBarButtonItemStylePlain target:self action:@selector(buttonAction:)];
    if (self) {
        _block = block;
    }
    return self;
}

- (void) buttonAction:(id)sender{
    self.block();
}

@end
Al inicializar el botón le pasamos el bloque que se ejecutará
BlockButtonItem * boton = [[BlockButtonItem alloc] initWithTitle:@"Pulsame" block:^{
    NSLog(@"He sido pulsado!");
}];

self.navigationItem.rightBarButtonItem = boton;
Problemas con los bloques:
Cuando en el bloque referenciamos un objeto que a la vez (directa o indirectamente) referencia al bloque, da lugar a retain circle. Para ello podemos crear una referencia weak a self con __weak:
- (void)updateUserHomeTown{
    __weak typeof(self) weakSelf=self;
    [self.requestManager homeTownForUser:self.user
                              completion:^(CityEntity *resultCity){
        weakSelf.homeTownCity=resultCity;
    }];
}
Pero cuando en mi bloque se necesita que se ejecute algo, y no se libere self aun cuando su referenciador ya está pidiendo ser liberado, para estos casos críticos la solución es es:
- (void)updateUserHomeTown{
    __weak typeof(self) weakSelf=self;
    [self.requestManager homeTownForUser:self.user
                              completion:^(CityEntity *resultCity){
        __strong self typeof(weakSelf)=weakSelf;
        self.homeTownCity=resultCity;
    }];
}
Embelleciendo el código
Con la librería libextobjc podemos usar @weakify() y @strongify():
Sin @weakify @strongify:
- (void)updateUserHomeTown{
    __weak typeof(self) weakSelf=self;
    [self.requestManager homeTownForUser:self.user
                              completion:^(CityEntity *resultCity){
        __strong self typeof(weakSelf)=weakSelf;
        self.homeTownCity=resultCity;
    }];
}
Con @weakify @strongify:
- (void)updateUserHomeTown{
    @weakify(self);
    [self.requestManager homeTownForUser:self.user
                              completion:^(CityEntity *resultCity){
        @strongify(self);
        self.homeTownCity=resultCity;
    }];
}
AFNetworking
AFNetworking es una librería para la gestión de tareas de networking para iOS y OS X que funciona a modo de envoltorio de las librerías del Foundation URL Loading System. Cuando hablamos de Foundation URL Loading System estamos hablando de NSURLConnection y de NSURLSession.
Una buena práctica consiste en crear una clase que te abstraiga del uso de la librería, que nos de cierta libertad para sustituirla en un futuro sin tener que cambiar todas las peticiones a red que se hacen en toda la app.
Para ello creamos una clase que podemos llamar por ejemplo RequestManager.
RequestManager.h
#import <Foundation/Foundation.h>

typedef void (^RequestManagerSuccess)(id data);
typedef void (^RequestManagerError)(NSError *error);

@interface RequestManager : NSObject

@property (copy,nonatomic) NSString *baseDomain;

- (void)GET:(NSString *)path parameters:(id)parameters successBlock:(RequestManagerSuccess)successBlock errorBlock:(RequestManagerError)errorBlock;

...

(El resto de tipos de peticiones POST, PUT, etc.)

@end
Y la implementación .m podría ser así:
#import "RequestManager.h"
#import "AFHTTPRequestOperationManager.h"

@implementation RequestManager
- (instancetype)init
{
    self = [super init];
    if (self) {
        _baseDomain=@"http://ironhack4thweek.s3.amazonaws.com";
    }
    return self;
}
- (void)GET:(NSString *)path parameters:(id)parameters successBlock:(RequestManagerSuccess)successBlock errorBlock:(RequestManagerError)errorBlock{
    AFHTTPRequestOperationManager *manager = [AFHTTPRequestOperationManager manager];
    [manager GET:[self.baseDomain stringByAppendingPathComponent:path] parameters:nil success:^(AFHTTPRequestOperation *operation, id responseObject) {
        successBlock(responseObject);
    } failure:^(AFHTTPRequestOperation *operation, NSError *error) {
        errorBlock(error);
    }];
}

@end
Lo más interesante es que cada modelo/entidad encapsulemos todas sus peticiones de red entro de una clase. Por ejemplo para implementar las peticiones de TVshows hacemos una clase ShowsProvider:
ShowsProvider.h
#import <Foundation/Foundation.h>
#import "RequestManager.h"

@interface ShowsProvider : NSObject
- (void)showsWithSuccessBlock:(RequestManagerSuccess)successBlock errorBlock:(RequestManagerError)errorBlock;
@end
ShowProvider.m
#import "ShowsProvider.h"
#import "TVshow.h"

@interface ShowsProvider()
@property (strong,nonatomic) RequestManager *requestManager;
@end
@implementation ShowsProvider
- (instancetype)init
{
    self = [super init];
    if (self) {
        _requestManager=[[RequestManager alloc] init];
    }
    return self;
}
- (void)showsWithSuccessBlock:(RequestManagerSuccess)successBlock errorBlock:(RequestManagerError)errorBlock{

    NSString *path=@"shows.json";
    NSDictionary *parameters=@{};
    [self.requestManager GET:path parameters:parameters successBlock:^(id data) {
        NSMutableArray *shows=[NSMutableArray array];
        if ([data valueForKey:@"shows"] && ((NSArray *)[data valueForKey:@"shows"]).count) {
            for (NSDictionary *showDictionary in [data valueForKey:@"shows"]) {

                TVshow *show=[[TVshow alloc] init];
                show.id=[showDictionary valueForKey:@"id"];
                show.title=[showDictionary valueForKey:@"title"];
                show.description=[showDictionary valueForKey:@"description"];
                show.posterURL=[NSURL URLWithString:[showDictionary valueForKey:@"posterURL"]];
                [shows addObject:show];
            }
        }
        successBlock(shows);
    } errorBlock:^(NSError *error) {
        errorBlock(error);
    }];
}
@end
Traerse la lista de series ahora es tan fácil como:
- (void)loadShows{

    [self.showsProvider showsWithSuccessBlock:^(id data) {
        self.myshows=data;
        [self.tableView reloadData];
    } errorBlock:^(NSError *error) {

    }];
}
Donde self.myshows es una propiedad del controlador.
Concurrencia
Grand Central Dispatch (GCD) es una API de bajo nivel para gestionar la concurrencia. Una de sus grandes ventajas es que nos abstrae de la arquitectura del dispositivo.
¿Cómo crear un proceso en otra cola? dispatch_async
/// Here executes on one queue

dispatch_queue_t dispatch_queue=dispatch_get_global_queue(DISPATCH_QUEUE_PRIORITY_BACKGROUND, 0);

dispatch_async(dispatch_queue, ^{

    /// Here executes on other queue

});
Cada hilo se ejecuta una cola al mismo tiempo. Sin embargo una cola puede ejecutar operaciones en diferentes hilos.
main_queue es un caso especial de cola que se ejecuta siempre en el hilo principal. Todo lo relacionado con la interfaz de usuario (UIKit) se ejecutan sobre este main_queue.
Ejercicio: En el proyecto de las series, en el TableView, descargar las imágenes usando una cola secundaria:
- (UITableViewCell *)tableView:(UITableView *)tableView cellForRowAtIndexPath:(NSIndexPath *)indexPath
{
    MyViewCell *cell = [tableView dequeueReusableCellWithIdentifier:@"mycell" forIndexPath:indexPath];

    cell.loggedUser = self.loggedUser;
    cell.coreDataManager = self.coreDataManager;

    TVshow * serie = [self.myshows objectAtIndex:indexPath.row];
    cell.myTitle.text = serie.title;
    cell.myDescription.text = serie.description;

    dispatch_async(dispatch_get_global_queue(DISPATCH_QUEUE_PRIORITY_HIGH, 0), ^{

        NSData *data = [NSData dataWithContentsOfURL: serie.posterURL];
        UIImage *downloaded = [UIImage imageWithData:data];

        dispatch_async(dispatch_get_main_queue(), ^{
            cell.myPoster.image = downloaded;
        });

    });

    return cell;
}
Nota: La descarga de la imagen se lleva a cabo en el hilo secundario, sin embargo el dibujado se debería hacer en el hilo principal, por tanto lo traemos de vuelta con:
dispatch_async(dispatch_get_main_queue(), ^{
    cell.myPoster.image = downloaded;
});
dispatch_once
+ (instancetype)sharedInstance{
    static dispatch_once_t onceToken;
    static SingletonClass *instance;
    dispatch_once(&onceToken, ^{
        instance = [[SingletonClass alloc]init];
    });
    return instance;
}
dispatch_once nos permite ejecutar código una sola vez durante la ejecución de la app. Es la manera más usada y recomendada para crear un singlenton.
dispatch_queue_create
dispatch_queue_t dispatch_queue = dispatch_queue_create("com.myawesomeapp.process.processdata", DISPATCH_QUEUE_CONCURRENT);
dispatch_queue_create crea una nueva cola que puede ser retenida y reusada.
DISPATCH_QUEUE_CONCURRENT nos permite ejecutar multiples operaciones concurrentes y DISPATCH_QUEUE_SERIAL limitaría solo una operación a la vez en la cola.
Ejercicio: Crear un serial dispatch_queue para procesar los datos de nuestro provider de series.
Solución: Creamos una propiedad que sería nuestra cola para hacer peticiones de series:
...
@property (strong, nonatomic) dispatch_queue_t serial_dispatch_queue;
...
En el init del provider, creamos la cola:
- (instancetype)init
{
    self = [super init];
    if (self) {
        _requestManager=[[RequestManager alloc] init];
        _serial_dispatch_queue = dispatch_queue_create("com.semana4lunes.process.processdata", DISPATCH_QUEUE_SERIAL);
    }
    return self;
}
Y cuando vayamos a lanzar la petición asíncrona, lo hacemos pasándola nuestra cola:
...
dispatch_async(self.serial_dispatch_queue, ^{
    ...
});
...
Ejercicio: Aunque tenemos una categoría de UIImageView para “setear” la imagen dada una URL, ahora tenemos que crear un singleton llamado ImageDownloader que se encarga de descargar las imágenes en su propio hilo:
Solución: Primero creamos el singleton, en el .h:
#import <Foundation/Foundation.h>

@interface ImageDownloader : NSObject

+ (instancetype)sharedInstance;
- (void)downloadImageWithURL:(NSURL *)imageURL completion:(void (^)(UIImage * image))completion;

@end
La implementación del .m:
#import "ImageDownloader.h"

@interface ImageDownloader ()
@property (strong, nonatomic) dispatch_queue_t downloadQueue;
@end

@implementation ImageDownloader

+ (instancetype)sharedInstance
{
    static dispatch_once_t onceToken;
    static ImageDownloader *instance;
    dispatch_once(&onceToken, ^{
        instance = [[ImageDownloader alloc] init];
    });
    return instance;
}

- (instancetype)init
{
    self = [super init];
    if (self) {
        _downloadQueue = dispatch_queue_create("com.miapp.process.download", DISPATCH_QUEUE_CONCURRENT);
    }
    return self;
}

- (void)downloadImageWithURL:(NSURL *)imageURL completion:(void (^)(UIImage * image))completion{

    dispatch_async(self.downloadQueue, ^{

        NSData *data = [NSData dataWithContentsOfURL: imageURL];
        UIImage *downloaded = [UIImage imageWithData:data];

        dispatch_async(dispatch_get_main_queue(), ^{
            completion(downloaded);
        });

    });
}


@end
Por último, en nuestra categoría, hacemos uso de esta clase:
#import "UIImageView+vitaminada.h"
#import "ImageDownloader.h"

@implementation UIImageView (vitaminada)

- (void)setImageWithURL:(NSURL *)imageURL completion:(void (^)(BOOL success))completion{

    [[ImageDownloader sharedInstance] downloadImageWithURL:imageURL completion:^(UIImage *image) {
        self.image = image;
        completion(YES);
    }];
}

@end
Caché:
Como estamos reusando las celdas, cada vez que se muestran se desencadena la descarga de la imagen. Pasos:
- Creamos un singleton que podemos llamar CacheManager con dos métodos públicos que nos permite guardar una imagen en disco registrándola en un plist y leer la imagen para evitar descargarla de nuevo. Este sería el .m:
#import <Foundation/Foundation.h>

@interface CacheManager : NSObject

+ (instancetype)sharedInstance;
- (void) getCachedImageWithURL: (NSURL *) url completion:(void (^)(UIImage * image))completion;
- (void) saveInCache: (NSData *) image withFilename:(NSString *) filename fromURL: (NSURL *) url completion:(void (^)(BOOL completion))completion;

@end
- Esta sería una posible implementación de estos dos metodos:
- (void) getCachedImageWithURL: (NSURL *) url completion:(void (^)(UIImage * image))completion{
    NSString * path = [self itemInPlistWithURL:url];

    if(!path){
        completion(nil);
    }

    NSString *documentsPath = [NSSearchPathForDirectoriesInDomains(NSDocumentDirectory, NSUserDomainMask, YES) firstObject];
    NSString *filePath = [documentsPath stringByAppendingPathComponent: path];
    UIImage * image = [UIImage imageWithData:[NSData dataWithContentsOfFile:filePath]];
    completion(image);
}

- (void) saveInCache: (NSData *) image withFilename:(NSString *) filename fromURL: (NSURL *) url completion:(void (^)(BOOL completion))completion{

    NSString *documentsPath = [NSSearchPathForDirectoriesInDomains(NSDocumentDirectory, NSUserDomainMask, YES) firstObject];
    NSString *filePath = [documentsPath stringByAppendingPathComponent:filename];
    [image writeToFile:filePath atomically:YES];

    [self insertItemInPlist:filename fromURL:url];
    completion(YES);
}
- Los métodos privados auxiliares son:
#pragma mark - private methods

- (NSString *) itemInPlistWithURL: (NSURL *) url{
    NSDictionary * items = [self itemsInPlist];
    NSString * filename = [items objectForKey:[url description]];
    return filename;
}


- (NSDictionary *) itemsInPlist {
    return [NSDictionary dictionaryWithContentsOfFile:self.filePath];
}


- (void) insertItemInPlist: (NSString *) filename fromURL: (NSURL *) url {
    NSMutableDictionary * dictionary = [NSMutableDictionary dictionaryWithDictionary:[self itemsInPlist]];
    [dictionary setObject:filename forKey:[url description]];
    [dictionary writeToFile:self.filePath atomically:YES];
}
- En nuestro singleton para descargar las imágenes, deberíamos comprobar primero si la imagen está cacheada y en el caso de que no, se descarga y enviarle a nuestro “CacheManager” los datos necesarios para que la cachee.
Locks
A veces, que varios hilos tengan acceso a los mismos recursos puede provocar comportamientos inesperados o bugs difíciles de depurar. Por ello podemos usar locks para proteger secciones importantes de nuestra app y sincronizar el acceso a ellas. El uso de estos requiere precaución porque si se hace incorrectamente genera problemas de otro nivel.
Los Deadlocks representan situaciones en las que un hilo está esperando que se libere un recurso del otro hilo, y a la vez tiene bloqueado un proceso, en que el segundo hilo está a la espera.
dispatch_queue_t myDispatchQueue;
dispatch_async(myDispatchQueue, ^{
    /// Some code
    dispatch_sync(myDispatchQueue,^{
        /// This never reaches
    });
});
Clásico error de novato: dispatch_sync bloquea la cola inmediatamente hasta el final del bloque, por tanto la siguiente invocación a dispatch_sync mantendrá el hilo a la espera a que se libere y esto no pasará hasta continue la ejecución, o sea: deadlock.
Cada vez que intentamos bloquear dos recursos a la vez, es una posible fuente de deadlocks, un code smell de libro.
Los livelocks son parecidos a los deadlocks pero sin que haya hilos bloqueados de por medio, por ejemplo con ficheros en disco. Se entiendo mejor con la metáfora de los dos hombres muy educados en el que uno le cede el paso al otro por educación y el segundo hace lo mismo.
La mejor manera de lidiar con livelocks y deadlocks es evitando bloquear dos recursos a la vez.
@syncronize
Esta directiva nos permite sincronizar fácilmente el acceso a secciones críticas de nuestra app.
- (void)myMethod:(id)anObj
{
    @synchronized(anObj)
    {
        // Everything between the braces is protected
        // by the @synchronized directive.
    }
}
Es común pasarle self a la directiva para sincronizar varias secciones o una variable estáticas de tipo string, para asegurarse de que cuando se invoque exista y no apunte a nil.
En nuestro ejemplo anterior en el que creábamos un singleton para gestionar la caché, podríamos bloquear la lectura y escritura de las imágenes y del plist.
...
@synchronized(self){
    image = [UIImage imageWithData:[NSData dataWithContentsOfFile:filePath]];
}
...
@synchronized(self){
    [image writeToFile:filePath atomically:YES];
}
...
@synchronized(self){
    plisData = [NSDictionary dictionaryWithContentsOfFile:self.filePath];
}
...
@synchronized(self){
    [dictionary writeToFile:self.filePath atomically:YES];
}
...
}
Nota: el uso de @synchronized exige el uso del Exception Handle.
NSLock
Otra forma de bloquear secciones para garantizar la sincronización.
@property(strong,nonatomic) NSLock *criticalResourceLock;

- (NSLock *)criticalResourceLock{
    if(!_criticalResourceLock){
        _criticalResourceLock=[[NSLock alloc] init];
    }
    return _criticalResourceLock;
}
BOOL moreToDo = YES;
NSLock *theLock = [self criticalResourceLock];
...
while (moreToDo) {
    /* Do another increment of calculation */
    /* until there’s no more to do. */
    if ([theLock tryLock]) {
        /* Update display used by all threads. */
        [theLock unlock];
    }
}
NSLock siempre libera el bloqueo en el mismo hilo en el que se bloqueó.
Para nuestro ejemplo, podríamos hacer algo así:
...
@property (strong,nonatomic) NSLock *criticalResourceLock;
...
- (NSLock *)criticalResourceLock{
    if(!_criticalResourceLock){
        _criticalResourceLock=[[NSLock alloc] init];
    }
    return _criticalResourceLock;
}
...
while (![self.criticalResourceLock tryLock]) {}
UIImage * image = [UIImage imageWithData:[NSData dataWithContentsOfFile:filePath]];
[self.criticalResourceLock unlock];
...
Semana 5
La semana 5 viene cargadita de mucho Core Data y TDD de la mano de otro grande: Jorge Ortiz.
Los ejercicios que propone, con una duración bien prefijada, están acompañados por un proyecto Xcode de base publicado en su Github.
Malometer
https://github.com/jdortiz/Malometer
Basic Core Data demo: Full use of Core Data the “hard way”, using KVC.
Create project (2 min)
Learn the basics.
- Open Xcode
- New project iOS -> Application -> Master-Detail Application
- Product Name: “Malometer”, Devices: “iPhone”, Select “Use Core Data”
- Choose directory and maintain create git repository selected.
Review project template contents (5 min)
Understand how the template works.
- Visit Malometer.xcdatamodeld: 1 entity, 1 attribute.
- Visit Main.storyboard: Expected screens. No buttons!
- Visit MasterViewController.m:
- Buttons added in code?
- Coupling between VC and model (Example insertNewObject)
- Run the app to see how it works.
Changes to the model (10 min)
Use our own model with the template.
Edit the name of the entity in the model. Change it to Agent.
Delete the attribute.
Create 3 new attributes:
name :: String, not optional, indexed
destructionPower :: Integer 16, not optional
motivation :: Integer 16, not optional
Run it and it will crash. From the terminal
$ cd ~/Library/Application\ Support/iPhone\ Simulator $ find . -name Malometer.app $ cd
/Documents $ rm Malometer.sqlite*
Change the query of the fetchedResultsController (2 min)
Make the table display the agents (for when they are ready later).
- Run it and it will crash. The name of the entity and the attribute in fetchedResultsController are wrong. Change them.
- Change the name of the entity to “Agent” and the attribute to “name”
Modify the view controller to add model objects (20 min)
Create a new view controller that will later allow to edit the agent data. In this step, only the views are put in place and the basic initialization.
- Rut it again and tap on the plus button at the top. It will crash because the creation still uses the attribute timeStamp. Shouldn’t we change it once for all the code?
- Comment out the insertNewObject method.
- Remove the creation of the add button in viewDidLoad and comment out the creation of the edit button.
- Time to edit the detail view controller to populate the fields. Use the storyboard to create these fields in the viewcontroller:
- Delete the existing label.
- Add five labels.
- Add one textfield and configure its parameters..
- Add two steppers and configure its parameters.
- In the detail view controller header, define IBOutlets for the three labels that will change, the text field and the two steppers.
- Connect the outlets to their respective object in interface builder.
- Initialize each of the controls in viewDidLoad. Use arrays for the named values of the 3 properties of the agent object.
Connect the view controllers for creating agents (10 min)
Have a segue that works to enable editing newly created agents.
- Delete the existing segue that connects master and detail view controllers.
- Embed the view controller in a navigation vc.
- Add a new “+” button to the master view controller.
- Create a modal segue from the button to the detail view controller and name it “CreateAgent”.
- Change the name of the property of the detail view controller from detailItem to agent.
- Modify the metod prepareForSegue of the master view controller:
- Define a constant string for the class with the name of the segue.
- Extract the destination view controller.
- Create a new agent object.
- Pass it to the detail view controller
- Run and test. Notice there is no way to go back.
Add actions to the Agent edit view controller (20 min)
Respond to the events of the interface in the view controller used for editing that make the user go back to the main view controller.
- Add new header file with the protocol to dismiss the view controller. (1 method, modifiedData)
- In the detail, import the new header and define a delegate property.
- Make the header of the master implement the protocol.
- Assign the delegate in the prepareForSegue of the master.
- Implement the method in the master that dismisses the view controller. (No data saving yet)
- Define the two actions for each bar button in the detail view controller.
- In the storyboard create two bar buttons to cancel and save the contents of the detail view controller.
- Connnect them with their respective actions.
- Run it and it will throw an error. Change the attribute name of the configureCell method.
Create actions for the controls of the detail view controller (10 min)
Define actions to respond to the events generated by the steppers and use that data in the saving process.
- Inside of the save action include a method to read the values from the text field and applies it to the agent object.
- Define a new method to deal with the destruction power changes and apply those changes to the assessment value.
- Connect the method to stepper for the destruction value.
- Run and verify that the labels aren’t updated.
- Create the analogous method for the motivation stepper and connect it.
Show the updated values of the agent object in the view controller (10 min)
Update the labels of interface when the values change. This is done by pushing the changes.
- Add a method for each label to display its value based on the respective agent property.
- Invoke the required methods in each of the stepper actions.
- Refactor viewDidLoad
- Run and verify that the labels are updated.
- Verify that the steppers only change within the expected range or solve in Interface Builder.
Persist the data (15 min)
Use the undo manager to forget about objects that the user decides cancelling their creation. Save the context to make the (not-undone) changes persistent (in the file system).
- Review the app delegate, the section of the Core Data Stack.
- Create an undo manager and assign it to the moc. Configure it to not create groups by event and limit the number of undos to 10.
- Begin an undo group before creating the new object in the master view controller.
- Set the action name for the undo operation and end the undo group in the method that is used to dismiss the detail view controller.
- If modified data should be preserved, call the save method of the context.
- If modified data should be dismissed, rollback the change.
Janitorial changes (5 min)
Cleaner code.
- Remove commented out code.
- Rename the detail view controller to AgentEditViewController using the refactoring capabilities of Xcode.
- Rename the Master view controller to AgentsViewController.
Subclassing the managed object
This is the way Core Data is commonly used. Objective-C objects are mapped to the database with their properties and methods.
Create Agent as a subclass of MO (10 min)
Have the class ready to be able to use it in the rest of the code. Use properties instead of KVC.
- Use Xcode to generate the subclass.
- Review the generated subclass.
- Replace the code to use the properties in the Agents view controller.
- Import the Agent.h header
- Change configureCell.
- Change the type of the object created in your prepare for segue method.
- Replace the code to use the properties in the Agent edit view controller.
- Change its header so the agent type is Agent * using a forward declaration.
- Import the Agent.h header in the implementation file.
- Replace all the invocation to setValue:forKey: and valueForKey: by the corresponding properties.
Observing the model (15 min)
Be able to react to changes in the model instead of pushing them from the events.
- Remove the call to the method that updates the label of the destruction power from the action assigned to its stepper.
- Add the view controller as an observer for the keypath agent.destructionPower in viewWillAppear
- Remove the observer in viewDidDisappear
- Write the method to respond to the value changes so it updates the text of the label.
- Run and test that the label is updated.
- Repeat for the same sequence for the motivation attribute.
Move logic to the model (20 min)
Understand the value provided by transient properties. Have properties that depend on other properties.
The way to calculate assessment is part of the model. However, it is outside of the model itself.
- Create a new attribute in the model: assessment: int16, transient, non optional.
- Chech Agent.h and Agent.m. Nothing has changed, they must be regenerated. Do so.
- Create the getter for it in the implementation file that uses the equation to calculate the assessment and returns it.
- Use it in the method to display the assessment.
- Remove the call to the method that updates the label of the assesment from the actions assigned to both steppers.
- Add an observer for its keypath. Run and check that it doesn’t work.
- Add calls to the getter notify that the value will/did change for the assessment key.
- Tell Core Data that the value of assessment depends on the other two attributes. ((NSSet *)keyPathsForValuesAffectingAssessment).
- Refactor the actions assigned to the setters.
More properties and primitive values for dependencies in categories (20 min)
Understand how the custom setters and getters in Core Data and how to define dependencies in a category.
- Create a new string attribute called pictureURL (optional, not indexed).
- Regenerate the subclass.
- Verify the regenerated files and notice what is missing.
- Create a “Model” category of the agent class.
- Recover the model logic code from the previous git commit and put it in the Model category.
- Run it. It will crash. Remove the database, run it again and test the model logic. WARNING: the results here MAY vary.
- Put two breakpoints in the two methods of the logic model and notice that the class method (might not) isn’t called.
- Create constant strings for the properties in the category implementation and declare them as extern in the header.
- In any case, create setters for the motivation and the destruction power that update the primitive value of assessment and get rid of the class method.
Revisiting model logic (15 min)
Make the interface easier to use, and the created objects editable using a second segue to the same view controllers.
- Add to the agent edit view controller the delegate method for the text field that alows the keyboard to be dismissed. And connect the view controller to the text field as delegate.
- Create another segue to the navigation controller connected to the agent in order to revie and visit agent objects when they are selected from the table.
Assign and view the picture (1:30h)
Have the user interface required to select/edit/delete images.
- Move all the controls of the agent edit view controller downwards to leave space for the picure.
- Create a 100x100 button with the label “Add image”
- Create an action in the view controller that shows an action sheet (Take photo, Select photo, Delete photo).
- Make the view controller and action sheet delegate and add the method that responds to the action sheet options.
- Use UIImagePickerVC to obtain the images from the user.
- Persistence of the images must be a separated object (SRP).
Relationships and Predicates
Having the data inside of the database is important, but it is even more important to be able to extract the data that we want from it.
Move the query to the model (15min)
Queries are part of the model, so they belong there.
- Add a class method to the Agent category that provides the fetch request used by the fetch results controller of the agents view controller.
- Try it with fetched results controller. Verify the order.
- Create a similar request with a predicate as a parameter. Use it to filter out the agents with a destruction power smaller than 2.
Create relationships (10 min)
Relationships is one of the most powerful features of Core Data. Let’s define the model to be able to use them.
- Define 2 new entities:
- “FreakType”: with attribute “name”: string, non optional, indexed and relationship “agents”, optional, cardinality: 1 category includes many agents, delete rule: cascade. Reverse relationship “category”, optional, delete rule, nullify.
- “Domain”: with atribute “name”: string, non optional, indexed and relationship “agents”, optional, cardinality 1 domain has many agents, delete rule: denay. Reverse relationship “domains”, 1 agent works in many domains, delete rule: nulify.
- Regenerate the subclasses (all three). And delete the database, once again.
Create controls to edit the category and domains (30 min)
Modify the user interface to be able to use the relationships.
- Add two text fields besides the picture.
- Add two iboutlets for them in the agent edit view controller header, connect them and set the view controller as delegate.
- Create a method that, when the text field has finished being edited, parses the string (spliting by commas for the domains, and nothing for the category) and creates an attributed string decides with green colors for objects that already exist, and red for the ones that don’t. The implementation of whether they exist or not will be done later.
Work with relationships (20 min)
Add logic to the FreakType entity that will make working with relationships easier.
- Create a convenience constructor for the FreakType that uses a name.
- Create a class method that returns the FreakType with the provided name in the given managed object context.
- Use those two methods when saving the agent.
- Create the analogous methods for the domains. Keep in mind that the relationship with the domains is expressed using a NSSet.
Sorting the results (10 min)
Demonstrate different ways to sort the data. Understant the limitations of transient attributes.
- Create a new method of the Agent, that generates a fetch request sorted with the provided sort descriptors. Run it and see the results.
- Use the same method sorting by assesment. Run it and see what happens.
- You can also sort by more than one criteria. Try sorting by destruction power and then by name.
Fetch request (10 min)
Use relationship based sections in the table view.
- Modify the fetch results controller to use the category name as section.
- Add the table view data source method to return the name of the section from the corresponding object of the sections array in the fetched results controller.
- Complete the section header title with the average of the destruction power of the members of that section.
- Create a fetch request of the domains that returns those which have more than one agent with a destruction power of 3 or more.
- Calculate the number of results and display it in the title.
- Refresh it after controller did finish.
Exercises for the reader (15 min)
- Complete the CRUD. Delete an object when the user swipes over one of the table rows.
Unit testing demo: Testing the app delegate
Install the test Template.
Test return value: Sut not nil
Understand how to test a method for a return value.
- Delete existing unit test file.
- Under the MalometerTests folder create an “AppDelegate” group.
- Create the Test class for the app delegate.
- Remove from it all the Core Data related code.
- Validate the “sut is not nil” test.
Test state: managedObjectContext
Understand how to test a method that changes the state of the object.
- Check that the managed object context is created when accessed.
Test behavior: saving the data of a managed object context
Understand how to test a method that uses other objects.
- Add a test to check that the saveContext method tells the managedObjectContext to save the changes.
- Create a subclass of MOC in the same file (mocFake).
- Create an instance of that class in the test and inject it into the sut using kvc.
- Override the hasChanges method to return YES.
- Create a BOOL property to record the changes.
- Set the property to YES in the overriden save: method.
- Verify that it is yes.
Exercises for the reader (30 - 45 min)
- Test app documents directory is not nil, is a directory (not a file), contains Documents as the last component of the path…
- Test the managed object model and the persistent store coordinator are created when the managed object context is accessed.
- Test the root view controller is assigned the managed object context on launch.
Testing Core Data
Basic test of a model class (10 min)
- Create a unit test for the agent with the provided template, inside of a new “Model” group.
- Run and verify that it fails, because the object isn’t created properly.
- Uncomment and verify the creation and release of the Core Data stack.
- Use Agent+Model.h instead of just Agent.h when importing into the test file.
- Make the entity name shared.
- Change the createSut method to create an agent ala Core Data.
- Run and verify that it fails.
- Include the model in the unit test target.
- Run and verify that it works.
Versioning & migration
Understand how to change the model in a controller way. Be sure to have some data loaded (at least 3 agents for the examples).
Identifying the current model version (5 min)
Understand the current status of the model.
Run the program to check that it runs and displays the current data.
In the file inspector of the model fill in a new version identifier (1.0.0).
Run the program again to see that nothing has changed.
Using the terminal, go to the directory where the sqlite of the project is. Execute the following command and keep what follows NSStoreModelVersionHashesVersion resulting from the last one.
$ sqlite3 Malometer.sqlite
select * from sqlite_master where type=’table’; select * from Z_METADATA; .quit
Adding a new model version (10 min)
Create a the new version of the model.
- Add a new model version (Editor -> Add Model Version…)
- In the new model, add a new attribute to the Agent entity (Power: string, optional, not indexed.
- Edit the model version identifier of the new one to have the right one.
- Run and it will not crash.
- Check the hash and see that it is still the same.
- In the inspector of the model change the current model version to the new one.
- Run and it will crash. The value of NSStoreModelVersionHashesVersion will continue being the same.
Lightweight migration (5 min)
Let Core Data take care of the required changes to the data based on the new model.
- In the persistentCoordinator getter of the app delegate, create a new dicionary for the options to use with the persistent store.
- Add options to make automatic migration of the store and infer the mapping automatically and pass them to the persistent store addition process.
- Run it. It will not crash, but we haven’t made any change to the interface to know that the change has actually happened.
Verifying the change (5 min)
Check that the expected change has happened.
- Add a breakpoint to any method that uses an Agent object. For example AgentsViewController’s configureCell:atIndexPath:.
- Run ‘po agent’ in the debugger and verify that power is one of the attributes.
- In the terminal chech that the string after NSStoreModelVersionHashesVersionhas finally changed. The store has been migrated.
Populate data to preserve (10 min)
Prepare data for the next, more complex, migration.
- Regenerate the Agent subclass.
- In order to have some data add line in the prepareForSegue part of the edit view controller to set the power to Intelligence if the row is an even number or Strength if it is odd.
- Run it visit some (not all) of the agents and remember to save them.
- Use the debuger to print the fetchedObjects of the fetchedResultsController to verify that the data has been created.
- Close the application by quiting it from the simulator (task manager) and query the sqlite database to double-check that the data is there.
- Preserve a copy of the current database. Query that copy to ensure that the data is there. (MD5s appreciated).
A new model with complex changes (15 min)
Now our goal is to be able to have many powers per agent (a many to many relationship). Create the model for it.
- Add a new model based on Malometer 1.1.0 and call it Malometer2.
- Edit its identifier.
- Create a new entity Power with one attribute name: string, non optional, indexed.
- Create a to-many relationship in Agents: powers, and the inverse relationship in Power, agents that is also to-many.
- Remove the power attribute of the Agent entity.
- Regenerate the Agent and Power entities.
- Create a Model category of the Power class.
- Create a class method in Power to fetch a power with a given name in a given MOC.
- Build it, but DON’T Run the app or else it will loose the data, because lightweight migration is enabled. (if you make 2 the current version).
Create the mapping (20 min)
Provide the required information to preserve the names of the existing powers into the new entities, without duplicating them.
- Create a new file, Mapping Model, from version 1.1.0 to 2.0.0.
- Inspect (but don’t change) the newly created mapping.
- In the AgentToAgent entity mapping notice that there is the posibility to create a custom policy.
- Create subclass of NSEntityMigrationPolicy and call it AgentToAgentMigrationPolicy.
- Override the method createDestinationInstancesForSourceInstance:entityMapping:manager:error: It must do 4 things:
- Create the destination instance (an Agent in the destination context).
- Transfer the atributes from the source to the destination one.
- Extract a pawer instance with the name of the attribute (or use the already existing one) and relate it with the destination instance.
- Tell the migration manager to associate the source and destination instances.
- Use this class as the name of the custom policy for the Agents mapping.
- Make version 2 the current version of the model.
- Run and check with the debugger that the relationships exists. For any object that had a power in the previous dataset, po [[agent.powers anyObject] name]
Core Data Concurrency
We are going to import 10.000 agents everytime the application runs. This will happen in the app delegate.
Create a fake importer (15 min)
Create a method in the app delegate that simulates loading 10.000 registers taking 5 seconds to complete.
- Add a convenience constructor for the Agent with a given name.
- Define a fake importer method in the app delegate that does:
- Create a category with its convenience constructor (any name).
- Create 10.000 registers with different names using the convenience constructor.
- Relate the object and the category.
- Wait using usleep after each agent creation, so the total time is aprox. 5 secs.
- When all the objects have been created, save the changes.
- Invoke the method when the app has just finished launching, before anything else.
- Run the program and see what happens.
- Remove the database from the application directory.
Plan the task for a better moment (10 min)
Plan the task asynchornously in the same context / main thread.
- Change the creation of the managed object context so it is created with a concurrency type of main queue.
- Change the importer method so all the action happens inside of a block that is passed for asynchronous execution to the MOC.
- Remember to weakfy and strongfy self.
- Run the application an see if anything changes.
- Remove the database from the application directory.
Make a better importer (5 min)
Prepare the method to change the MOC.
- Change the importer method so it takes a managed object context as parameter.
- Use the parameter instead of the property in all the required places. Comment:
- It should be easier than the previous versions and less leaks.
Create an independent background context (20 min)
Have a different context to perform the time consuming process in a background queue. The database must be empty at the beginning of this section. It is necessary to add some logic to make the main context know about the changes.
- Define another property for the backgroundMOC.
- Write a lazy instantiation method for this property that creates this context with concurrency type private queue.
- Remember to set the persistent coordinator of this context to the existing one.
- Change the context used as parameter for the importer method to the background one.
- Run the app and wait for 15 seconds. Why doesn’t it appear?
- Use =sqlite3= to query the database to check if the data has been imported in saved.
- Stop the app and delete the database.
Making the main context aware of the changes in the other (10 min)
Receive the notifications produced by the background context when it saves the changes to merge them.
- Move the Core Data properties of the app delegate to private interface.
- Right after the application ends launcing, register to attend to the NSManagedObjectContextDidSaveNotification
- Create to the method that will handle the notification. It should accept just one NSNotification* paramter, and invoke the method of the main MOC that takes the notificaiton and merges the changes.
- Remember to deregister for receiving notifications in applicationWillTerminate.
- Run the application an see if the data is shown.
- Stop the app and delete the database.
Creating the nested contexts alternative (30 min)
Use nested context to have the parent updated automatically.
- Add a third MOC property and call it rootMOC.
- Synthesize the property.
- Make a copy of the backgroundMOC getter and rename it rootMOC (and the ivars used inside must be _rootMOC.)
- The managedObjectContext (also known as mainMOC.) getter needs to do the following things:
- Perform lazy instanciation.
- Instanciate the MOC with concurrency type Main.
- Become the child of the rootMOC
- Assign the undoManager to it.
- And return that value.
- The rootMOC getter needs to do the following things:
- Perform lazy instanciation.
- Verify the persistent coordinator exists.
- If it does, instanciate the MOC with concurrency type Private Queue.
- Assign the persistence coordinator to its property.
- And return that value.
- The backgroundMOC is much easier now:
- Performs lazy instantiation.
- Instanciates it with private queue concurrency type.
- Become the child of the managedObjectContext (or mainMOC)
- Remove the registration and deregistration for the notification of the MOC changes and the method for that.
- Run the app and wait until the objects appear on the table view.
- Check the contents of the database.
- Stop and delete the database.
Malometer TDD
https://github.com/jdortiz/MalometerTDD
Learn how to write code the TDD way.
Create project (5min)
Create new project in Xcode. Use the “Empty application” (iOS) template.
Call it “MalometerTDD” and use Core Data.
Close the project window.
Create a Podfile in the project directory.
platform :ios, “7.0”
target “MalometerTDD” do
end
target “MalometerTDDTests” do pod ‘OCMock’ end
Execute
pod installCopy the Core Data Test template
$ cd $ tar xjvf
/UnitTestTemplates.tar.bz2 Open MalometerTDD.xcworkspace
First test (test return) (10 min)
Make an initial test, in order to understand the pieces and the mechanics.
- Create the Agent entity in the model and declare the name, destructionPower and motivation as they were defined before.
- Generate the subclass.
- Generate the Model category.
- Remove the existing test.
- Create a new test file from the new template.
- Replace the imported header.
- Uncomment the createCoreDataStack invocation.
- Change the createSut to use a convenience constructor.
- Run the test and see that it fails.
- Add the source code in the category to create the Agent object.
- Run the test and see that it fails, but notice that it is related to “Agent not being located in the bundle.”
- Add the xcdatamodel file to the Tests target.
- Run the test and see that it succeeds.
TDD exercise
Now you play to get code from the tests.
Test the transient property (test state) (15 min)
Core Data properties need no testing, but the assessment that is calculated, is somthing to be checked.
- Add the transient property to the model as you did before.
- Write the first test to check the assessment value given a combination of destruction power and motivation.
- Run the test. Red.
- Hardcode the result.
- Run the test. Green.
- Add the second test for the transient property with another combination of values.
- Run the test. Red.
- Generalize the resuls.
- Run the test. Green.
Test KVO compliance (test behavior) (20 min)
will/didAccessValueForKey is required for maintaining relationships and unfaulting, so we must be sure that it works.
- Test behavior using OCMock.
- Understand the problems of mocking and Core Data.
- Replace properties with primitive values and voila!
- Refactor to include constants.
Test assessment dependencies (20 min)
Test that objects observing changes of assessment are notified when the other two properties change.
- Create a boolean iVar to flag changes and reset in the test setUp.
- Create a test that observes changes of assessment when motivation is changed.
- Write the code to pass the test. Notice that it breaks previous tests because the motivation isn’t persisted.
- Write another test to persist motivation.
- Write the code to pass the tests.
- Add another test to check full KVO compliance of motivation.
- Repeat the process for destructionPower.
Complete agent functionality (30 min)
Test other logic of the model.
- Add tests and code for the picture logic.
- Add tests and code for the fetch requests.
Create the other entities and their tests (30 min)
Extend the tests to the FreakType entity.
- Create the FreakType entity and the subclass.
- Run the test to confirm that everything is fine.
- Test the convenience constructor, NOT the relationship.
- Create a fixture for the fetches.
Test validation (20 min)
Validation is a key part of Core Data. Test that the data is validated only if follows our requirements and understand how to make this custom validations.
- Write the test to confirm that an empty agent name cannot be saved.
- Change the model to disallow empty agent names.
- Make another test to see that a name consisting only on spaces will not be accepted when saving.
- To add the validation include the validateName:error: to the Agent category. Pay attention to the input value: it is a pointer to an NSString *.
- Add another test to verify that the validation returns an error with a code when it doesn’t pass.
- Define the error codes in the category header.
- Create the error with the proper information to pass the test.
Add a self served stack: UIManagedDocument (15 min)
Undertand a different way to work with the Core Data Stack.
- Create the MalometerDocument class as subclass of UIManagedDocument.
- Create its corresponding test class.
- In the createSut method, create a fake URL and a new document with the initWithFileURL: initializer.
- Verify that the test passes.
- Write a test to ensure that the managed object context that the document provides is the one that you create for the tests.
- Replace the context in the createSut method.
- Run the test. It will fail. Change the context creation to be created with concurrency type NSMainQueueConcurrencyType.
Exercises for the reader (15 min)
- Test that pictures are deleted when objects are.
Import data
Make our object able to work with data in a different format.
Create a convenience constructor for importing (20 min)
Use convenience constructors, that consume the data in the expected format.
- Create a convenience constuctor that takes the MOC and a dictionary as parameters.
- Verify (tests) that the name, destruction power, and motivation are preserved.
Create convenience constructors for the other entities (20 min)
Apply the same concepts to the other entities.
- Create a convenience constuctor for the FreakType that takes the MOC and a dictionary as parameters.
- Verify (tests) that the name is preserved.
- Create a convenience constuctor for the Domain that takes the MOC and a dictionary as parameters.
- Verify (tests) that the name is preserved.
Import relationships (20 min)
Understand how the relationships can be recovered from the data and applied to our model.
- Modify the agent convenience constructor (with tests) so it is related with the (pre-existing) category that has the name provided in the dictionary with the “freakTypeName” key, as name.
- Modify the agent convenience constructor (with tests) so it is related with the (pre-existing) domains that have the names (array) provided in the dictionary with the “domainNames” key, as name.
General importer (30 min)
Make the importer method that performs all the required steps.
- Create the importData as a document method that takes a dictionary.
- Create (and test) as many FreakTypes as indicated in the array contained under the “FreakTypes” of the main dictionary key.
- Create (and test) as many Domains as indicated in the array contained under the “Domains” of the main dictionary key.
- Create (and test) as many Agents as indicated in the array contained under the “Agents” of the main dictionary key.
Preload existing data (20 min)
Understand how to provide seed data in our app.
- Create another lazy loaded property that returns the URL to the initial data. If it doesnt exist, it returns a path to a resource in the main bundle.
- Create a lazy loaded property for the document class for the file manager. If it doesn’t exist returns the defaultManager.
- Create a test to verify that if the storeURL passed to configurePersistentStoreCoordinatorForURL:ofType:modelConfiguration:storeOptions:error: doesn’t exist, it is copied from the URL to the initial data.
- Remember to call super.
Exercises for the reader
- Create an OSX target that loads a JSON file and uses this to store the data.
- Import images.
- Export methods.
Semana 6
Timer:
Propiedad:
@property (nonatomic, strong) NSTimer * timer;
Lazy getter
- (NSTimer *)timer
{
    if (_timer == nil)
    {
        _timer = [NSTimer scheduledTimerWithTimeInterval:1 target:self selector:@selector(fireTimer) userInfo:nil repeats:YES];

    }
    return _timer;
}
lo que hace:
- (void) fireTiemer {
    NSLog(@"Loop");
}
Para lanzarlo:
[[self timer] fire];
Si queremos pararlo, conviene hacerlo asi para evitar retain circle:
- (void) stopTimer{
    [self.timer invalidate];
    self.timer = nil;
}
Audio:
Importamos el framework:
#import <AVFoundation/AVFoundation.h>
propiedad
@property (strong, nonatomic) AVAudioPlayer * myAudio;
Reproduce:
- (void) playMySound {

    NSURL* url = [[NSBundle mainBundle] URLForResource:@"Torpedo" withExtension:@"wav"];
    NSError* error = nil;
    self.myAudio = [[AVAudioPlayer alloc] initWithContentsOfURL:url error:&error];
    if(!self.myAudio) {
        NSLog(@"Error creating player: %@", error);
    }

    [self.myAudio play];

}
Vibrate:
Importa el framework:
#import <AudioToolbox/AudioToolbox.h>
Lanzar vibración:
AudioServicesPlaySystemSound(kSystemSoundID_Vibrate);
Luz de flash:
- (void) fireFlash {
    NSLog(@"Loop");

    AVCaptureDevice *device = [AVCaptureDevice defaultDeviceWithMediaType:AVMediaTypeVideo];
    [device lockForConfiguration:nil];
    [device setTorchMode: AVCaptureTorchModeOn];
    [device unlockForConfiguration];

}
Sería mejor tener una propiedad:
@property (strong, nonatomic) AVCaptureDevice * device;
Que se inicializa al cargar:
- (void) setupDevice{
    self.device = [AVCaptureDevice defaultDeviceWithMediaType:AVMediaTypeVideo];
}
Y cuando quieras encender la luz:
[self.device lockForConfiguration:nil];
[self.device setTorchMode: AVCaptureTorchModeOn];
[self.device unlockForConfiguration];
Y cuando quieras apagar la luz:
[self.device lockForConfiguration:nil];
[self.device setTorchMode: AVCaptureTorchModeOff];
[self.device unlockForConfiguration];
Detectar los SHAKES:
En el didFinishLaunchingWithOptions del appDelegate:
application.applicationSupportsShakeToEdit = YES;
En el viewController:
- (BOOL)canBecomeFirstResponder{
    return YES;
}

- (void)motionEnded:(UIEventSubtype)motion withEvent:(UIEvent *)event{
    if (motion == UIEventSubtypeMotionShake){
        NSLog(@"shakeeee");
    }
}
Uso del giroscopio
Importo el framework:
#import <CoreMotion/CoreMotion.h>
Creo una propiedad del tipo CMMotionManager:
@property (strong, nonatomic) CMMotionManager *motionManager;
Activamos la “escucha” de los cambios en el acelerometro:
- (void) setupAccelerometer{
    self.motionManager = [[CMMotionManager alloc] init];
    self.motionManager.accelerometerUpdateInterval = .2;

    [self.motionManager startAccelerometerUpdatesToQueue:[NSOperationQueue currentQueue]
                                             withHandler:^(CMAccelerometerData *accelerometerData, NSError *error) {
                                                 [self outputAccelertionData:accelerometerData.acceleration];
                                                 if(error){

                                                     NSLog(@"%@", error);
                                                 }
                                             }];
}
En el bloque podemos llamar a una función que haga algo:
-(void)outputAccelertionData:(CMAcceleration)acceleration
{
    NSLog(@"x:%.2fg  y:%.2fg  z: %.2fg", acceleration.x, acceleration.y, acceleration.z);

}
Usar la camara
Importar el framework:
#import <MobileCoreServices/MobileCoreServices.h>
Conformar el protocolo de UIImagePickerControllerDelegate y UINavigationControllerDelegate:
@interface ViewController () <UIImagePickerControllerDelegate, UINavigationControllerDelegate>
Lanzar el uso de la camara:
- (void) useCamera{

    if([UIImagePickerController isSourceTypeAvailable:UIImagePickerControllerSourceTypeSavedPhotosAlbum]){
        UIImagePickerController *imagePicker = [[UIImagePickerController alloc] init];

        imagePicker.delegate = self;
        imagePicker.sourceType = UIImagePickerControllerSourceTypeCamera;
        imagePicker.mediaTypes = @[(NSString * ) kUTTypeImage];
        imagePicker.allowsEditing = NO;
        [self presentViewController:imagePicker animated:YES completion:nil];
    }
}
Podemos usar la imagen cuando se hace cierra la cámara:
- (void)imagePickerController:(UIImagePickerController *)picker didFinishPickingMediaWithInfo:(NSDictionary *)info{

    NSString *mediaType = info[UIImagePickerControllerMediaType];
    [picker dismissViewControllerAnimated:YES completion:nil];

    if ([mediaType isEqualToString:(NSString *)kUTTypeImage]) {
        UIImage *image = info[UIImagePickerControllerOriginalImage];
        self.myImage.image = image;
        UIImageWriteToSavedPhotosAlbum(image, self, nil, nil);
    }
}
Si queremos acceder al “Camera Roll” para obtener una imagen, habría que cambiar la propiedad sourceType del UIImagePickerController:
imagePicker.sourceType = UIImagePickerControllerSourceTypePhotoLibrary;
Sensor de proximidad
Podemos detectar cambios de proximidad con el sensor, añadiendo un observador:
- (void) setupProximitySensor{
    [[UIDevice currentDevice] setProximityMonitoringEnabled:YES];
    [[NSNotificationCenter defaultCenter] addObserver:self selector:@selector(proximityChanged) name:UIDeviceProximityStateDidChangeNotification object:nil];

}
Y hacer lo que queramos antes los cambios:
- (void) proximityChanged{
    NSLog(@"%d", [[UIDevice currentDevice] proximityState]);
}
Core Location
Importamos framework
#import <CoreLocation/CoreLocation.h>
Conformamos el protocolo de CLLocationManagerDelegate
@interface ViewController () <CLLocationManagerDelegate>
Creamos una propiedad para nuestro CLLocationManager
@property (nonatomic, strong) CLLocationManager * myManager;
Lanzamos nuestro Location Manager:
- (void) setupLocation{

    BOOL enabled = [CLLocationManager locationServicesEnabled];

    if(enabled){
        _myManager = [[CLLocationManager alloc] init];
        self.myManager.delegate = self;
        self.myManager.desiredAccuracy = kCLLocationAccuracyKilometer;
        self.myManager.distanceFilter = 500;
        [self.myManager startUpdatingLocation];
    }

}
Podemos recibir la información cuando el GPS detecte un cambio, implementando el método:
- (void)locationManager:(CLLocationManager *)manager didUpdateLocations:(NSArray *)locations{

    CLLocation *location = [manager location];
    CLLocationCoordinate2D myCoordinate = [location coordinate];
    NSLog(@"%f,%f", myCoordinate.latitude, myCoordinate.longitude);

}
Mostrar mapa
Insertar un MapView y crear una propiedad IBOutlet de MKMapView en el controlador:
@property (weak, nonatomic) IBOutlet MKMapView *myMap;
Centrar el mapa con la posición actual del usuario.
- (IBAction)goCenter:(id)sender {
    [self.myMap userLocation];
    CLLocationCoordinate2D myLocation = [[self.myMap userLocation] coordinate];
    MKCoordinateRegion viewRegion = MKCoordinateRegionMakeWithDistance(myLocation, 2000.0, 2000.0);
    MKCoordinateRegion ajustedRegion = [self.myMap regionThatFits:viewRegion];
    [self.myMap setRegion:ajustedRegion animated:YES];
}
Cambiar el tipo de vista de mapa.
Lo vamos hacer mostrando un ActionSheet para elegir el tipo:
- (IBAction)goType:(id)sender {
    UIActionSheet * as = [[UIActionSheet alloc] initWithTitle:@"MapType" delegate:self cancelButtonTitle:nil destructiveButtonTitle:nil otherButtonTitles:@"Satellite", @"Standard", @"Hybrid", nil];
    [as showInView:self.view];
}
Tenemos que conformar el delegado UIActionSheetDelegate:
@interface MapsViewController () <UIActionSheetDelegate>
E implementamos el método:
- (void)actionSheet:(UIActionSheet *)actionSheet clickedButtonAtIndex:(NSInteger)buttonIndex{
    switch (buttonIndex) {
        case 0:
            [self.myMap setMapType:MKMapTypeSatellite];
            break;

        case 1:
            [self.myMap setMapType:MKMapTypeStandard];
            break;

        case 2:
            [self.myMap setMapType:MKMapTypeHybrid];
            break;

        default:
            break;
    }
}
Buscar dirección usando Geocoding
- (void) addressSearch: (NSString*)searchString{

    NSMutableDictionary * placeDictionary = [[NSMutableDictionary alloc] init];
    NSArray *keys = @[@"Street", @"City"];
    NSArray * addressComponents = [searchString componentsSeparatedByString:@","];

    if(addressComponents.count == 2){
        [addressComponents enumerateObjectsUsingBlock:^(id obj, NSUInteger idx, BOOL *stop) {
            [placeDictionary setValue:obj forKey:keys[idx]];
        }];
    }

    CLGeocoder * geocoder = [[CLGeocoder alloc] init];
    [geocoder geocodeAddressDictionary:placeDictionary completionHandler:^(NSArray *placemarks, NSError *error) {
        if([placemarks count]){
            CLPlacemark * placemark = [placemarks firstObject];
            CLLocation * location = placemark.location;
            CLLocationCoordinate2D coordinate = location.coordinate;
            [self goCenterInCoordinate:coordinate];
        }
    }];

}
Centramos el mapa en la primera dirección resultante con:
- (void) goCenterInCoordinate: (CLLocationCoordinate2D) coordinate{

    MKCoordinateRegion viewRegion = MKCoordinateRegionMakeWithDistance(coordinate, 2000.0, 2000.0);
    MKCoordinateRegion ajustedRegion = [self.myMap regionThatFits:viewRegion];
    [self.myMap setRegion:ajustedRegion animated:YES];
}